Publish as A2A Agent
Nexent supports exposing published agents as A2A 1.0–compliant agents so that external systems can discover and call them via REST or JSON-RPC. This page describes how to publish an A2A agent and how to call one.
🚀 Publish Steps
- Open Agent Development and create or edit an agent
- Finish the configuration and save
- Click Publish
- In the publish options, check Publish as A2A Agent
- Confirm the publish
After a successful publish, the system displays the A2A agent's call info:
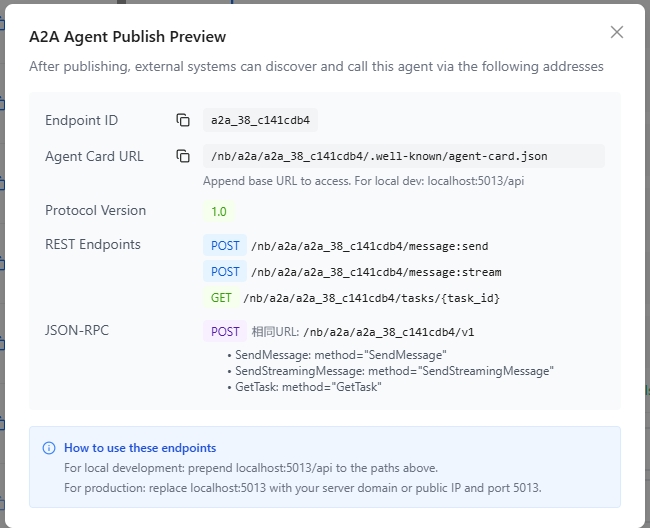
| Field | Description |
|---|---|
| Endpoint ID | Unique identifier for the A2A agent |
| Agent Card URL | Agent discovery endpoint; external systems use this URL to fetch the agent description |
| Protocol Version | A2A protocol version; currently 1.0 |
| REST Endpoint | REST-style API endpoint |
| JSON-RPC Endpoint | JSON-RPC 2.0 calling endpoint |
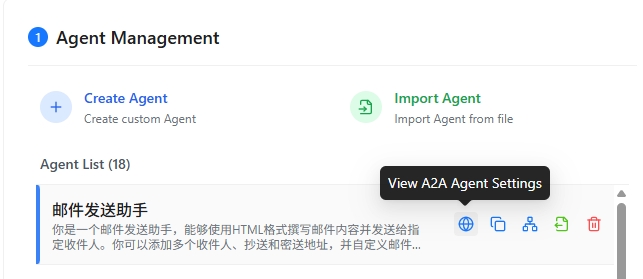
In the agent list, click the leftmost icon to view detailed calling information for the A2A agent.
📞 Calling Methods
A published A2A agent supports both REST and JSON-RPC. Pick whichever fits your use case.
REST API
# Get Agent Card (for Agent discovery)
GET /nb/a2a/{endpoint_id}/.well-known/agent-card.json

# Send synchronous message
POST /nb/a2a/{endpoint_id}/message:send
Content-Type: application/json

{
  "message": {
    "role": "user",
    "content": "Please help me complete a task"
  }
}

# Send streaming message (SSE)
POST /nb/a2a/{endpoint_id}/message:stream
Content-Type: application/json

{
  "message": {
    "role": "user",
    "content": "Please help me complete a task"
  }
}

# Get task status
GET /nb/a2a/{endpoint_id}/tasks/{task_id}
JSON-RPC 2.0
POST /nb/a2a/{endpoint_id}/v1
Content-Type: application/json

# Send synchronous message
{
  "jsonrpc": "2.0",
  "method": "SendMessage",
  "params": {
    "message": {
      "role": "user",
      "content": "Please help me complete a task"
    }
  },
  "id": 1
}

# Send streaming message
{
  "jsonrpc": "2.0",
  "method": "SendStreamingMessage",
  "params": {
    "message": {
      "role": "user",
      "content": "Please help me complete a task"
    }
  },
  "id": 2
}

# Get task status
{
  "jsonrpc": "2.0",
  "method": "GetTask",
  "params": {
    "taskId": "task_abc123"
  },
  "id": 3
}
Local Development Path Prefixes
| Deployment | Path Prefix |
|---|---|
| Docker | http://localhost:5013/nb/a2a |
| Kubernetes | http://localhost:30013/nb/a2a |
| Production | Replace with the server domain or public IP |
💡 Tip: A2A calls require valid authentication in the request header (
Authorization: Bearer {access_key}). Generate the API key from Personal Info → Generate API Key.
⚠️ Notes:
- The Agent Card is cached; the refresh interval is 1 hour
- To update the agent's info, you must republish the agent version
🔐 Authentication
Calling an A2A agent uses the same API key as the Northbound API:
Authorization: Bearer {access_key}Create and copy the key from Personal Info → Generate API Key.
🏷️ Version Management
- Published A2A agents cannot be modified, but you can publish new versions
- After a republish, external systems pick up the new info through the refreshed Agent Card
❓ FAQ
Q: Can normal publishing and A2A publishing be enabled at the same time?
Yes. When publishing, leave the default Northbound RESTful API enabled and also check Publish as A2A Agent to support both calling methods.
Q: My A2A call returns 401. Why?
Confirm the request header contains a valid Authorization field and that access_key is correct.
Q: How do I update an already-published A2A agent?
Republish the agent version. The new info becomes visible to callers through the refreshed Agent Card.