
Knowledge Configuration
In the Knowledge Base module, you can create and manage knowledge bases, upload files, monitor processing, maintain chunks, and generate summaries. Administrators and developers can share knowledge bases with user groups, while regular users can create and manage private knowledge bases.
Regular users can view Personal Knowledge Base Capacity at the bottom of the knowledge-base list, including current usage and the effective quota. If no limit is configured, the page shows Unlimited. When the quota is reached, Nexent blocks new content and file uploads but does not delete existing data.
🔧 Create a Knowledge Base
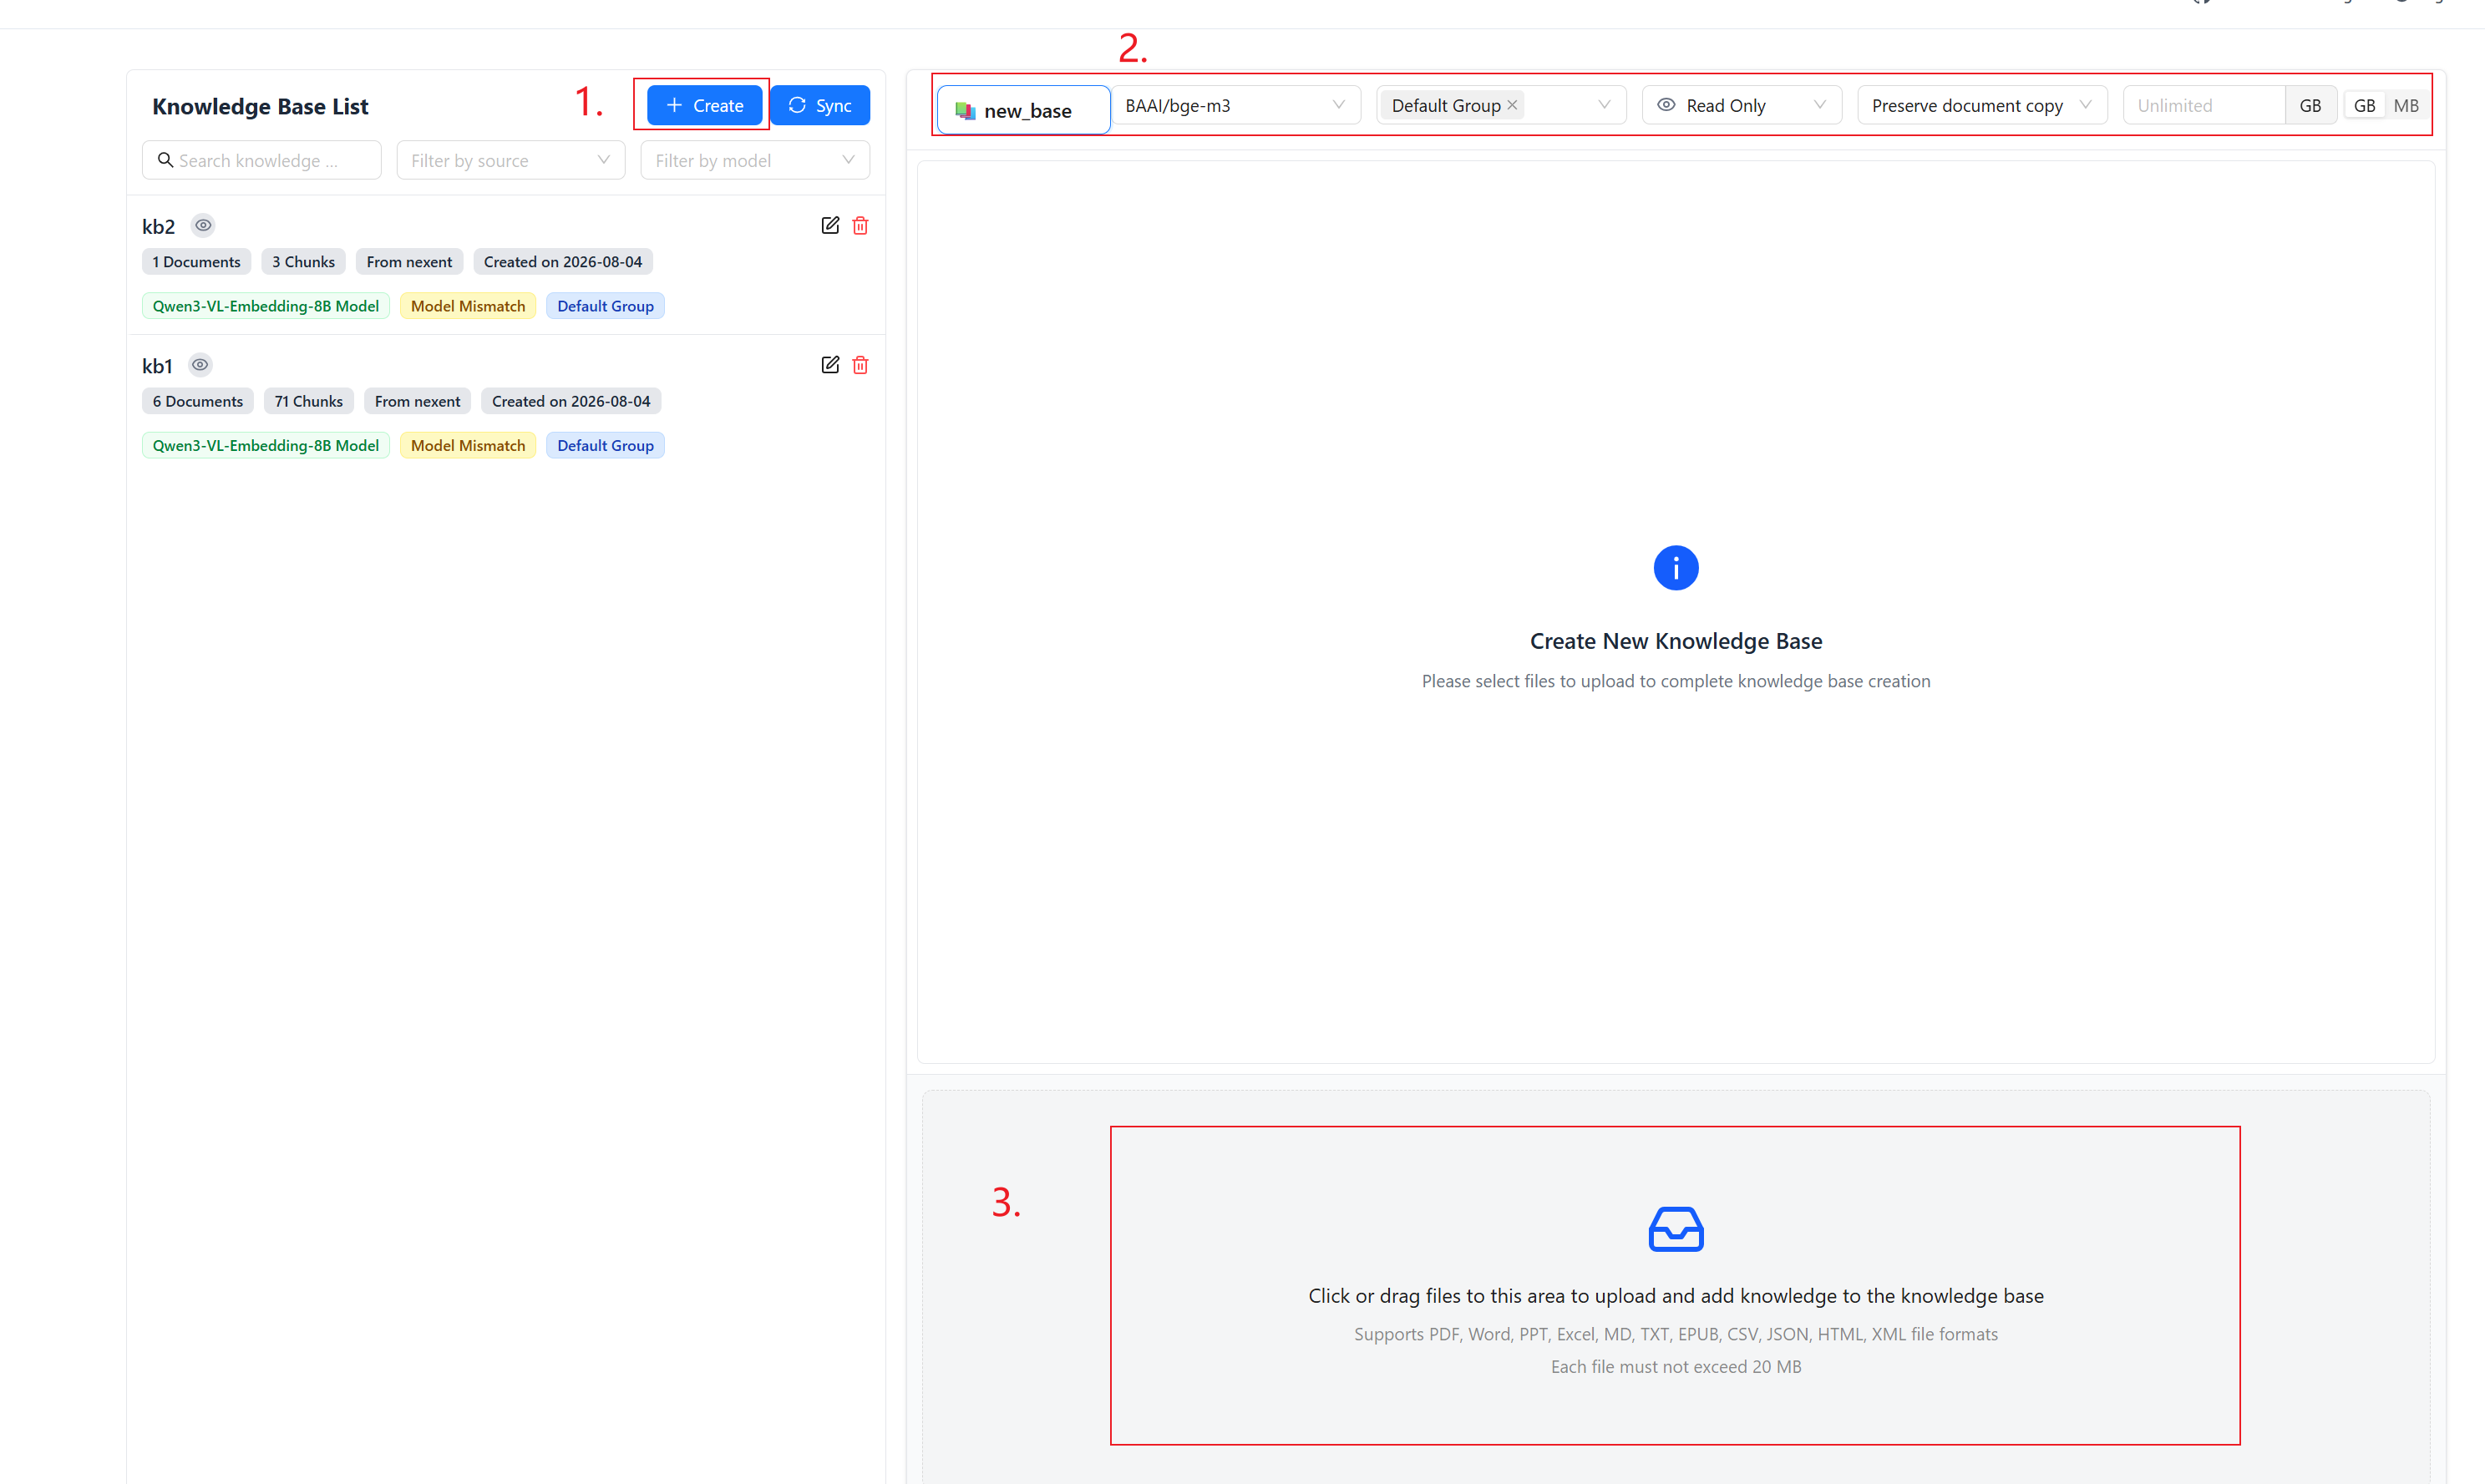
- Click Create Knowledge Base at the top of the left-side list
- In the creation panel, fill in the following fields:
| Field | Description |
|---|---|
| Name | Required. Must be unique and can only contain Chinese characters or lowercase letters. Spaces, slashes, and other special characters are not allowed. The system automatically checks for duplicates as you type |
| Embedding Model | Choose the vector model used to embed your documents. Models fall into two groups: Text Embedding (embedding) and Multimodal Embedding (multi_embedding). Selecting a multimodal model automatically enables vectorization of non-text content such as images. See Embedding Model Types |
| User Groups | Select which user groups can access this knowledge base (multi-select) |
| In-Group Permission | Controls what group members can do: Edit — upload and delete files; Read Only — view and search only; Private — only the creator can access |
| Preserve Source File | When enabled, uploaded files are kept in the system for later re-processing or download. When disabled, only the vectorized data is stored |
| Storage Quota | Optional. Set a storage cap for the knowledge base (switchable between GB and MB). The system raises a warning when storage usage approaches the quota |
- After configuring the fields above, select files to upload in the upload area below (or skip and upload later)
- Once files are uploaded, the knowledge base is created and processing begins automatically
📁 Upload Files
Upload Files
- Select a knowledge base from the list
- Click the upload area to pick files (multi-select supported) or drag them in directly
- Nexent automatically parses files, extracts text, and vectorizes the content
- Track the processing status in the document list
File Size Limit
Maximum upload size per file is 20 MB. Files exceeding this limit cannot be uploaded.
Before upload, Nexent also checks the knowledge-base quota, tenant capacity, and personal knowledge-base capacity. If the page reports insufficient capacity, delete files you no longer need or ask an administrator to adjust the relevant quota.
Document Processing Status
Uploaded files go through multiple stages. There are 6 distinct statuses:
| Status | Description |
|---|---|
| Waiting | File uploaded and queued for processing |
| Parsing | System is extracting text content from the file |
| Ingesting | Text is being vectorized and written into the vector database |
| Ready | Processing complete — the document is available for retrieval |
| Parse Failed | An error occurred during parsing. Hover over the status icon to see the detailed error reason and troubleshooting suggestions |
| Ingest Failed | An error occurred during vectorization. Hover over the status icon to see the detailed error reason and troubleshooting suggestions |
Hover over the status icon to view progress, such as “23/50 chunks processed.” For parsing or ingestion failures, the tooltip also provides a cause and suggested action. Common causes include:
- The file does not exist, exceeds 20 MB, or uses an unsupported type
- No valid text can be extracted, or the file contains an unsupported line-break format
- The embedding model is busy, its dimensions do not match, or the number of chunks exceeds its concurrency limit
- Elasticsearch, object storage, or the data-processing service is unavailable
- The knowledge base, tenant, or personal knowledge-base quota has been reached
Fix the issue shown in the tooltip and upload the file again. If the issue points to a platform service or storage capacity, contact an administrator instead of repeatedly submitting the same file.
Supported File Formats
The upload area currently supports:
- Text and structured data:
.txt,.md,.csv,.json,.xml - Web pages:
.html - PDF and e-books:
.pdf,.epub - Word:
.doc,.docx - PowerPoint:
.pptx - Excel:
.xlsx
A supported extension does not guarantee that valid content can be extracted. For example, an image-only scanned PDF may require OCR or another image-capable processing method.
📊 Knowledge Base Summary
Give every knowledge base a clear summary so agents can pick the right source during retrieval.
Generate and Edit Summaries Manually
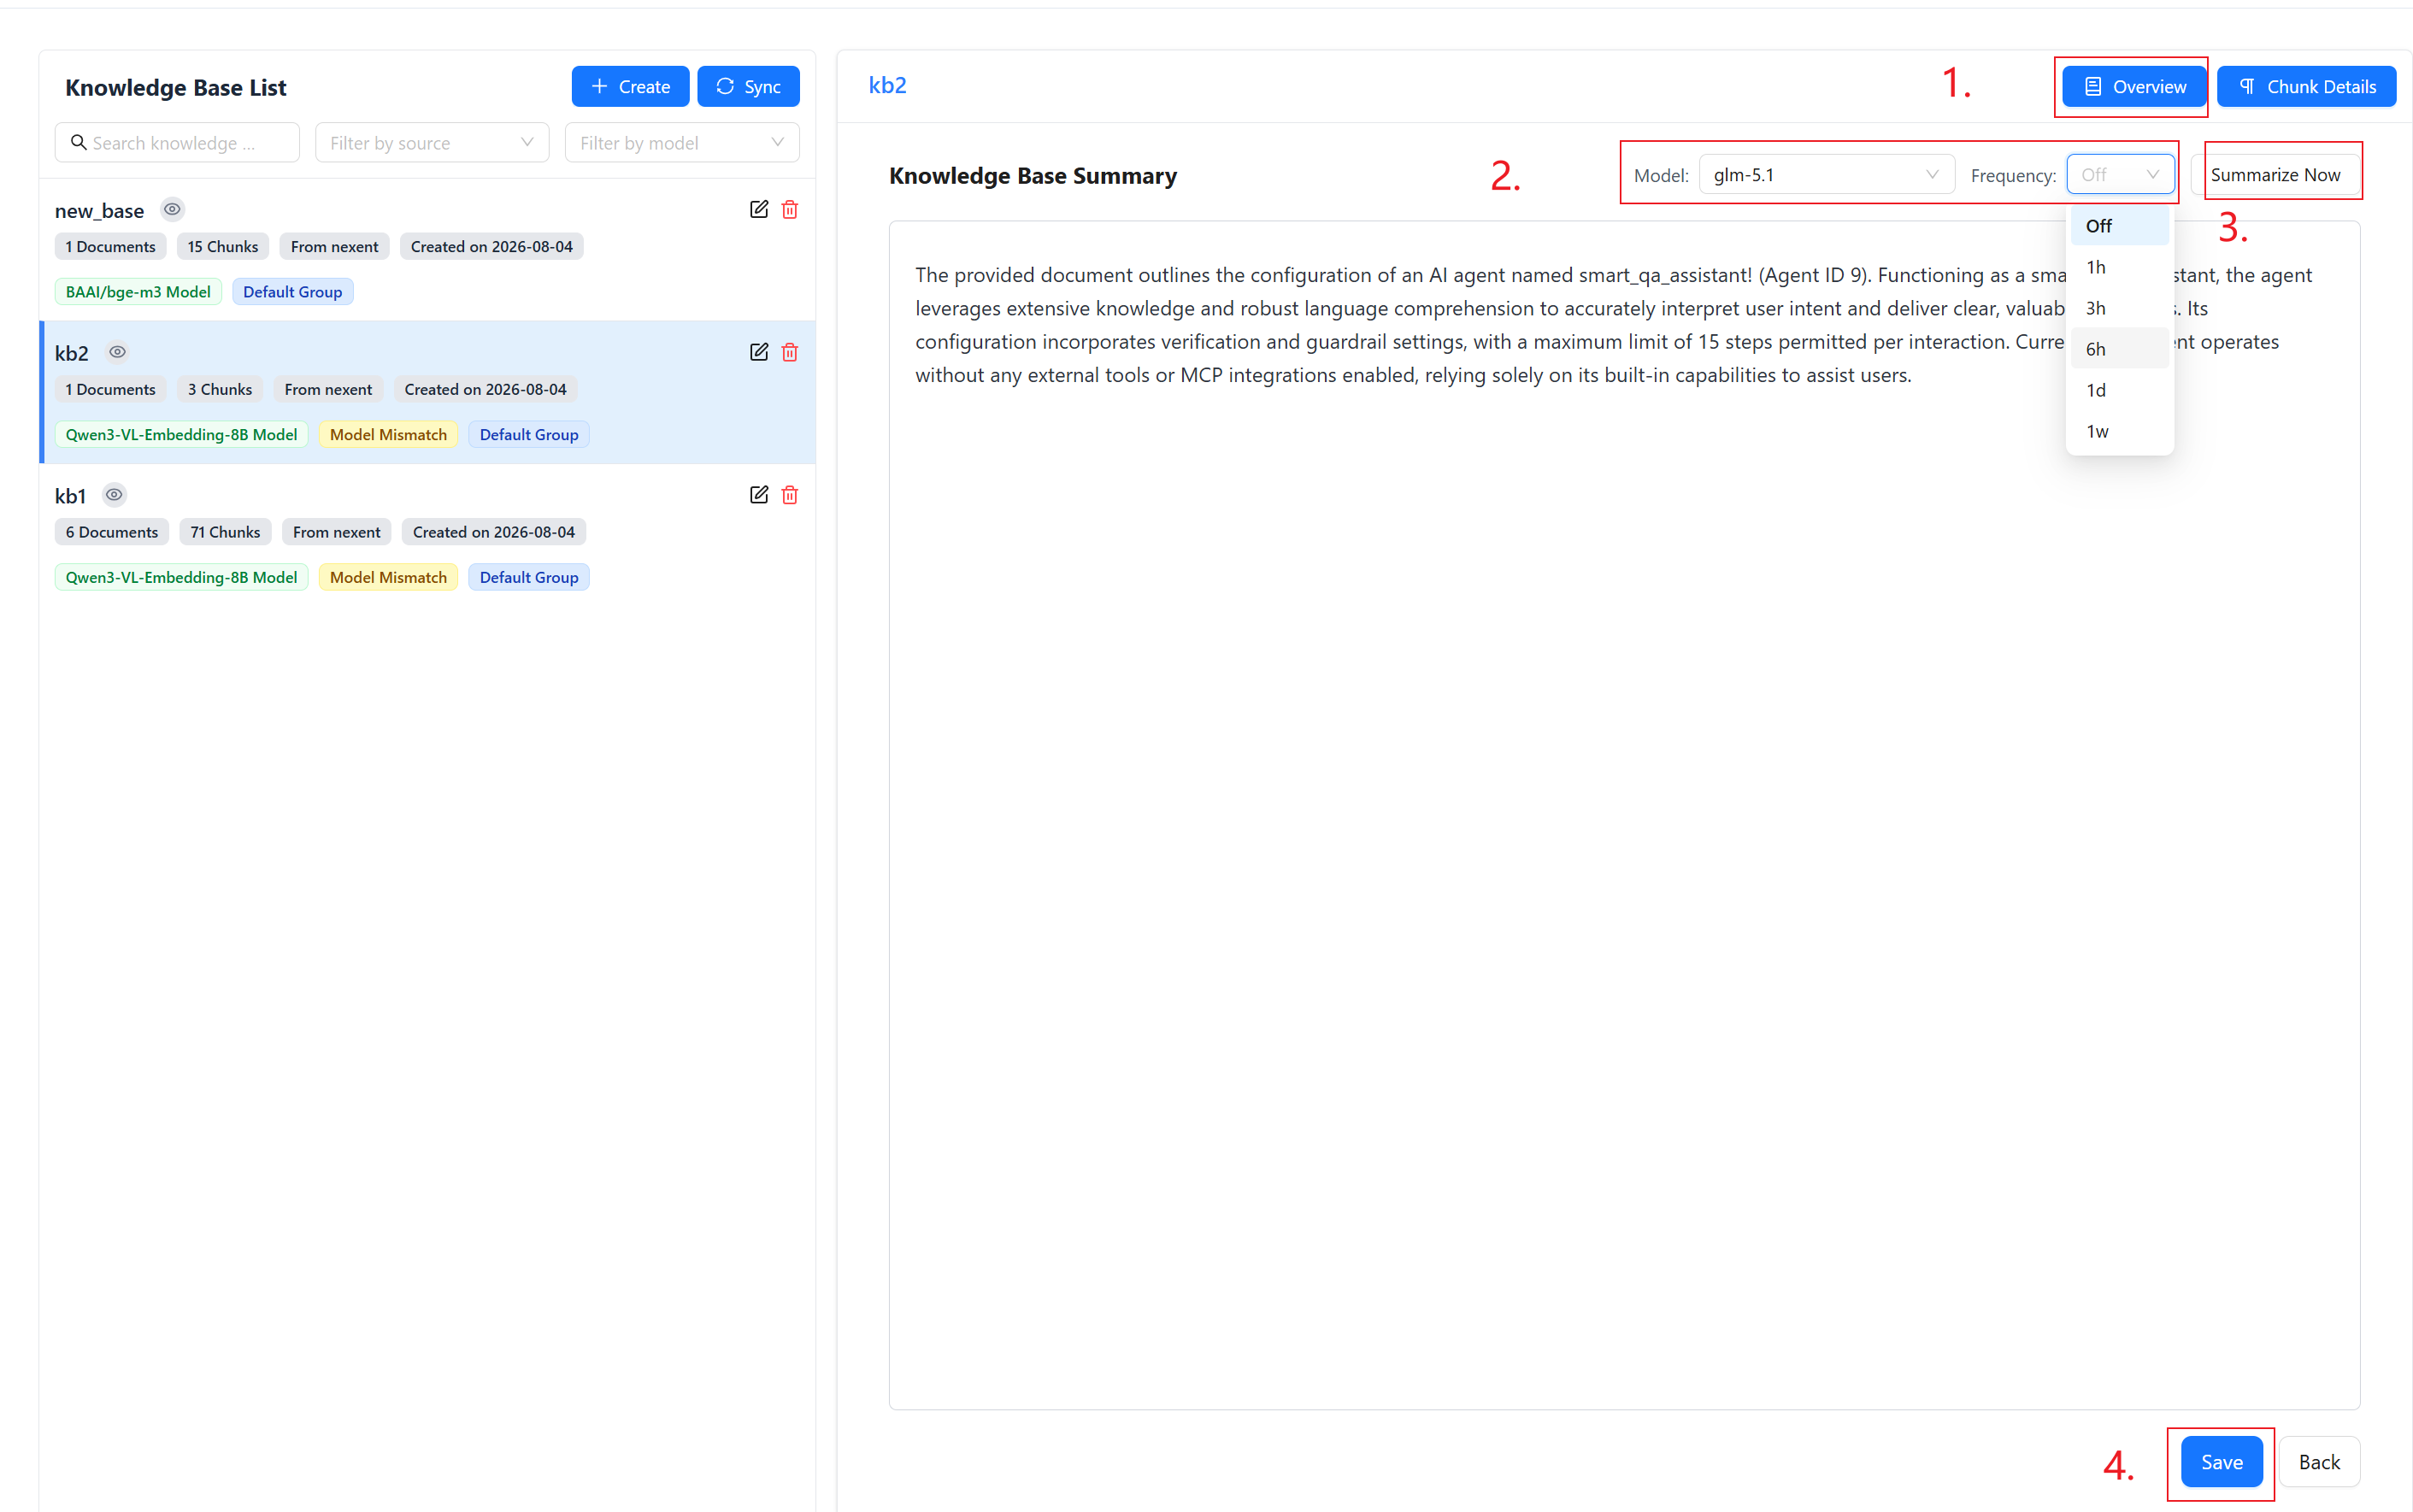
- Click Details to the right of the knowledge base name to open the overview page
- In the overview page, choose an LLM model and click Auto Summary to generate a description
- Edit the generated text to improve accuracy
- Click Save to store your changes
Scheduled Auto-Summary
In addition to manual triggers, you can configure scheduled auto-summary to let the system periodically regenerate the knowledge base summary in the background:
| Frequency | Description |
|---|---|
| 1 Hour | High-frequency updates — suitable for knowledge bases with frequent content changes |
| 3 Hours | Medium-high frequency updates |
| 6 Hours | Medium frequency updates |
| 1 Day | Once a day — suitable for most scenarios |
| 1 Week | Once a week — suitable for mostly static knowledge bases |
Select the frequency in the summary section of the overview page. The system intelligently checks whether the knowledge base has received document updates since the last run; if no new documents have been added or changed, the generation is skipped to save resources.
📂 Chunk Management
After upload, each document is split into multiple Chunks. Each chunk contains a segment of text and has a corresponding vector index entry. You can perform fine-grained management on chunks.
Viewing Chunks
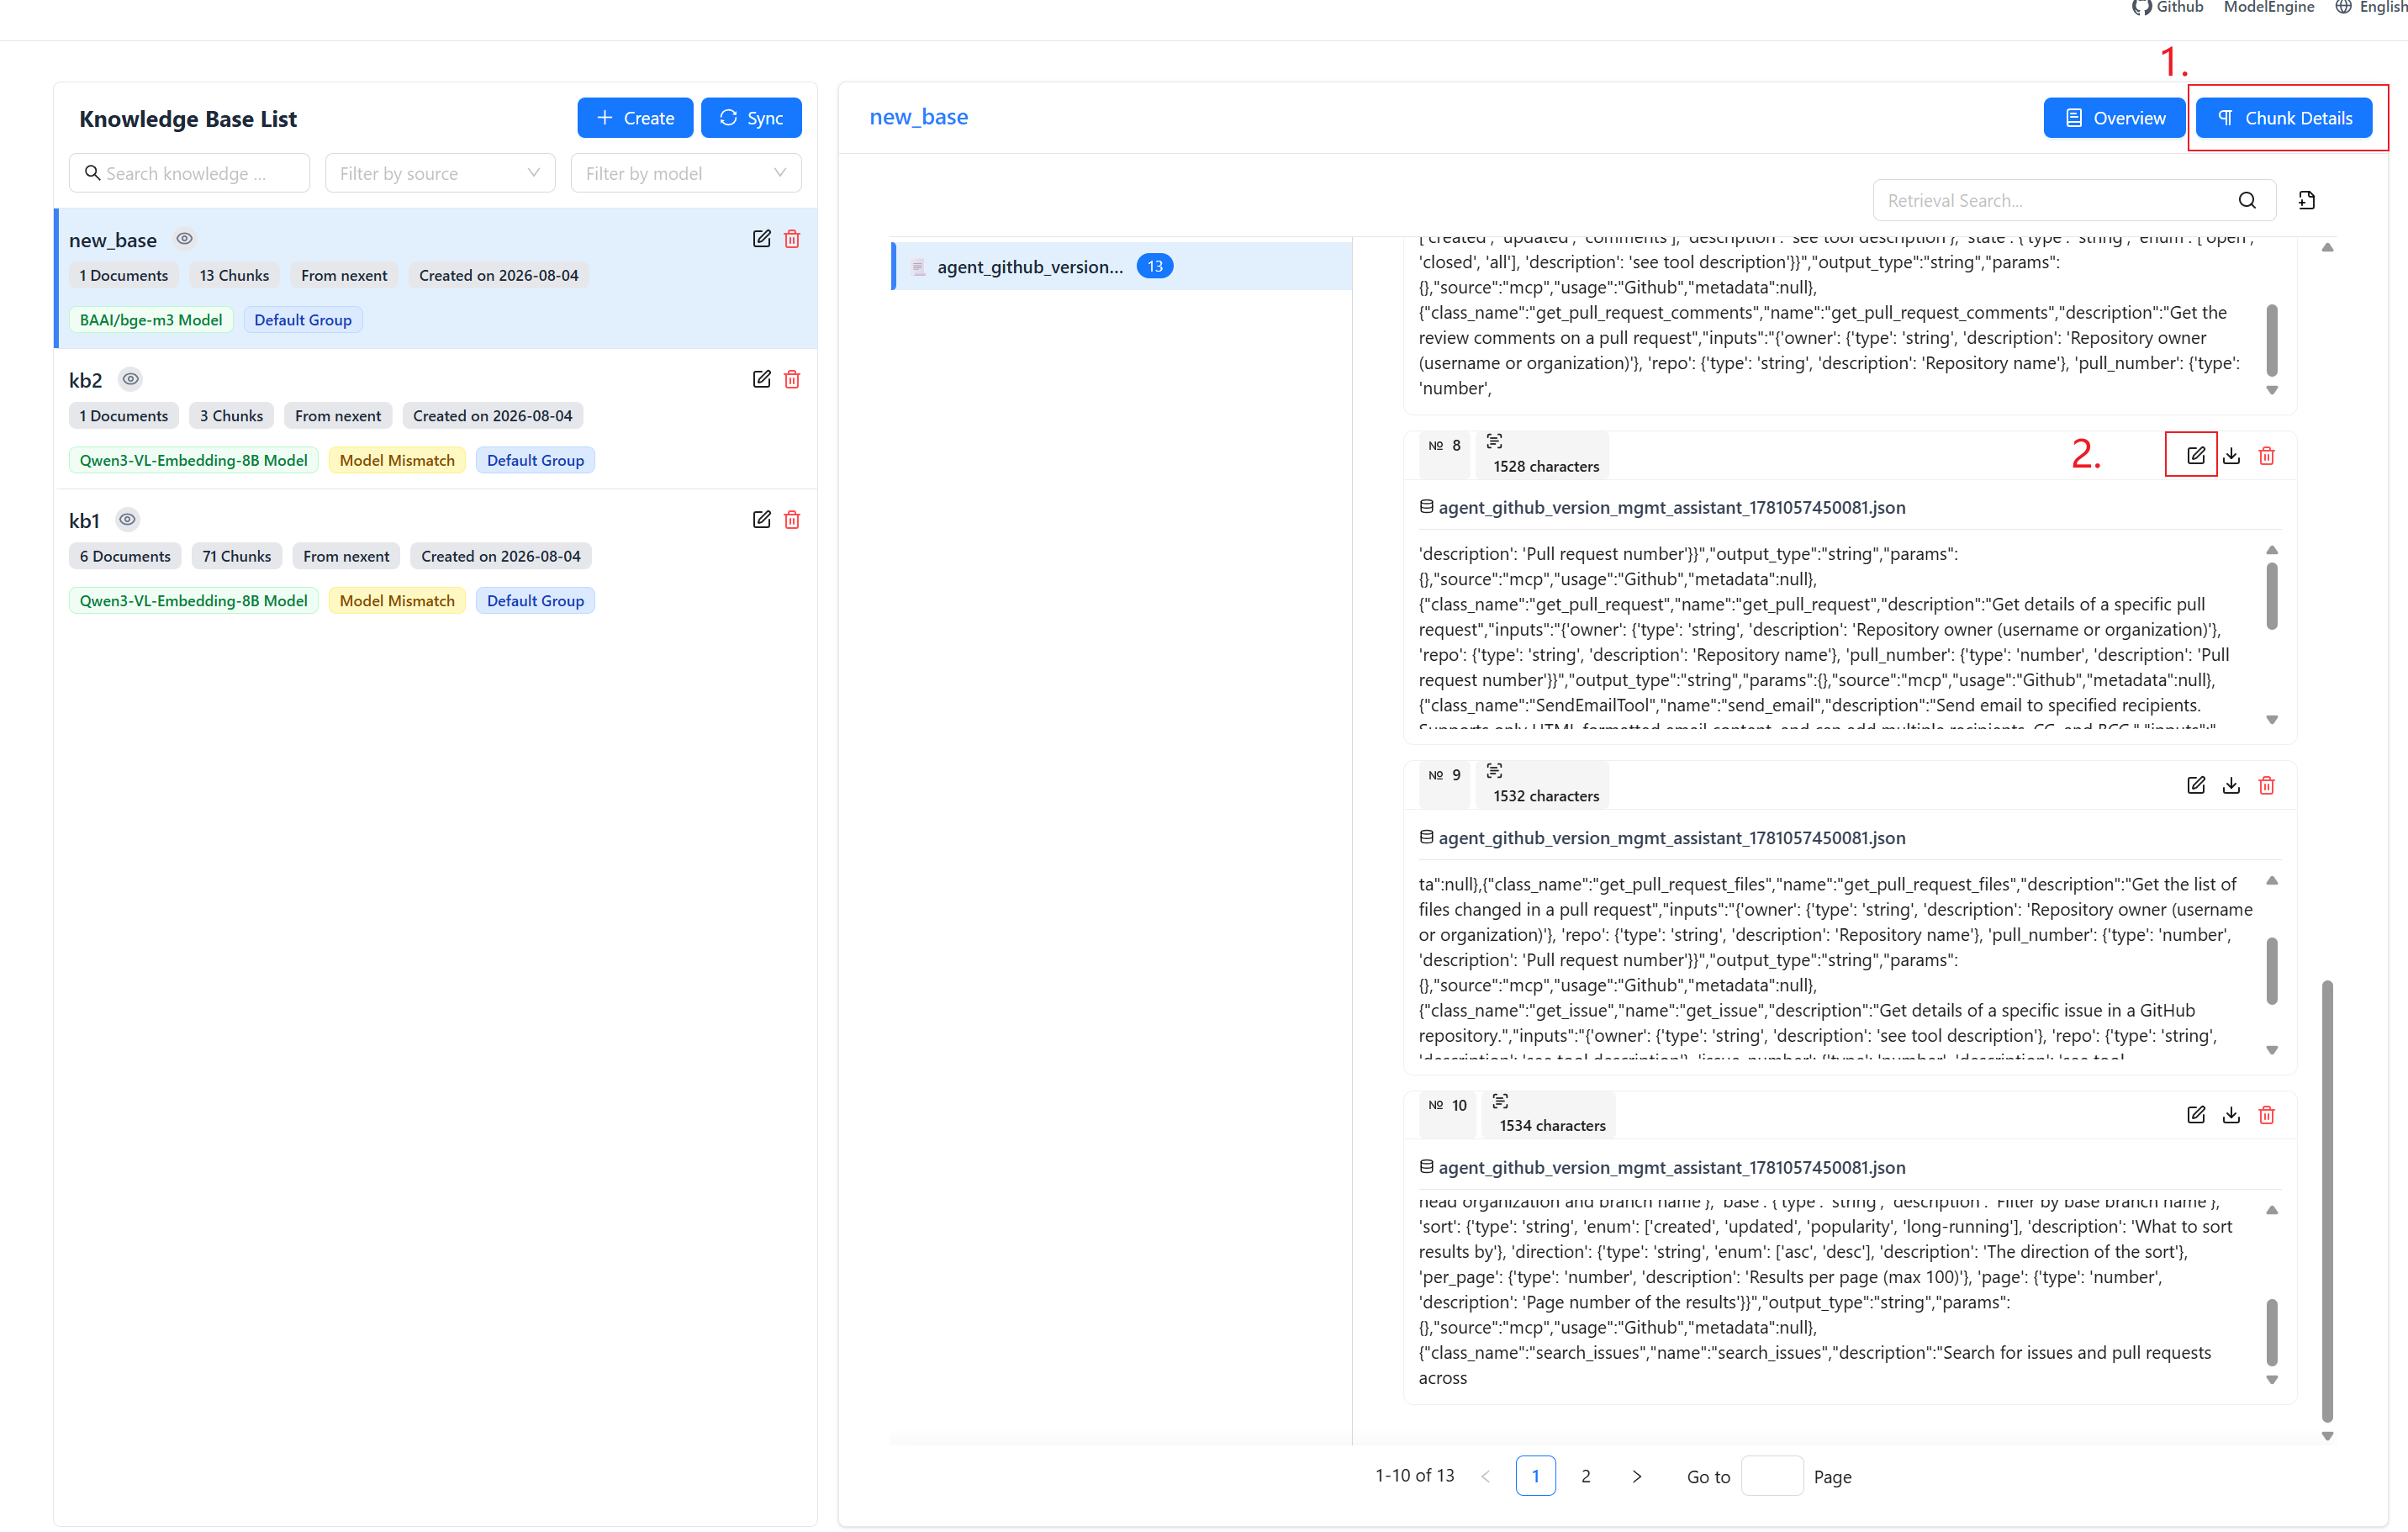
- Click a knowledge base name to open the document list
- Click the Chunk Details tab at the top
- All documents in the knowledge base are listed at the top of the page. Click any document to view all of its chunks
- Chunks are displayed as cards showing the chunk content and the source file name
Searching Chunks
Use the search box on the Chunk Details page to search for chunks. The system performs a hybrid search combining keyword and semantic matching, then ranks results by overall relevance. Clear the search box to return to the paginated list for the current document.
Manually Managing Chunks
| Action | Description |
|---|---|
| Create | Add a custom chunk on the Chunk Details page, then go to the last page to view it |
| Edit | Modify chunk text and regenerate its vector |
| Delete | Remove a chunk and update the knowledge base's chunk count |
| Download | Download one chunk as a .txt file |
Model Compatibility Restriction
Chunk edit and create operations depend on embedding model consistency. If the model configuration has changed, these operations may be automatically disabled to prevent incompatible vector data from being written.
🧩 Embedding Model Types
Embedding models in the system are divided into two categories:
- Text Embedding models (embedding): For vectorizing pure text documents (e.g., BGE, M3E)
- Multimodal Embedding models (multi_embedding): Can process both text and image content (e.g., DashScope, Jina)
The embedding model selected when a knowledge base is created remains bound to that knowledge base for its entire lifecycle. Choose the appropriate model type based on your document content when creating a knowledge base.
🔧 Using Knowledge Bases
Nexent supports binding knowledge bases to agents. When creating an agent, enable the relevant knowledge retrieval tool under Advanced Settings in the tool configuration area and select the associated knowledge bases.
For Nexent-native knowledge bases, enable the knowledge_base_search tool:
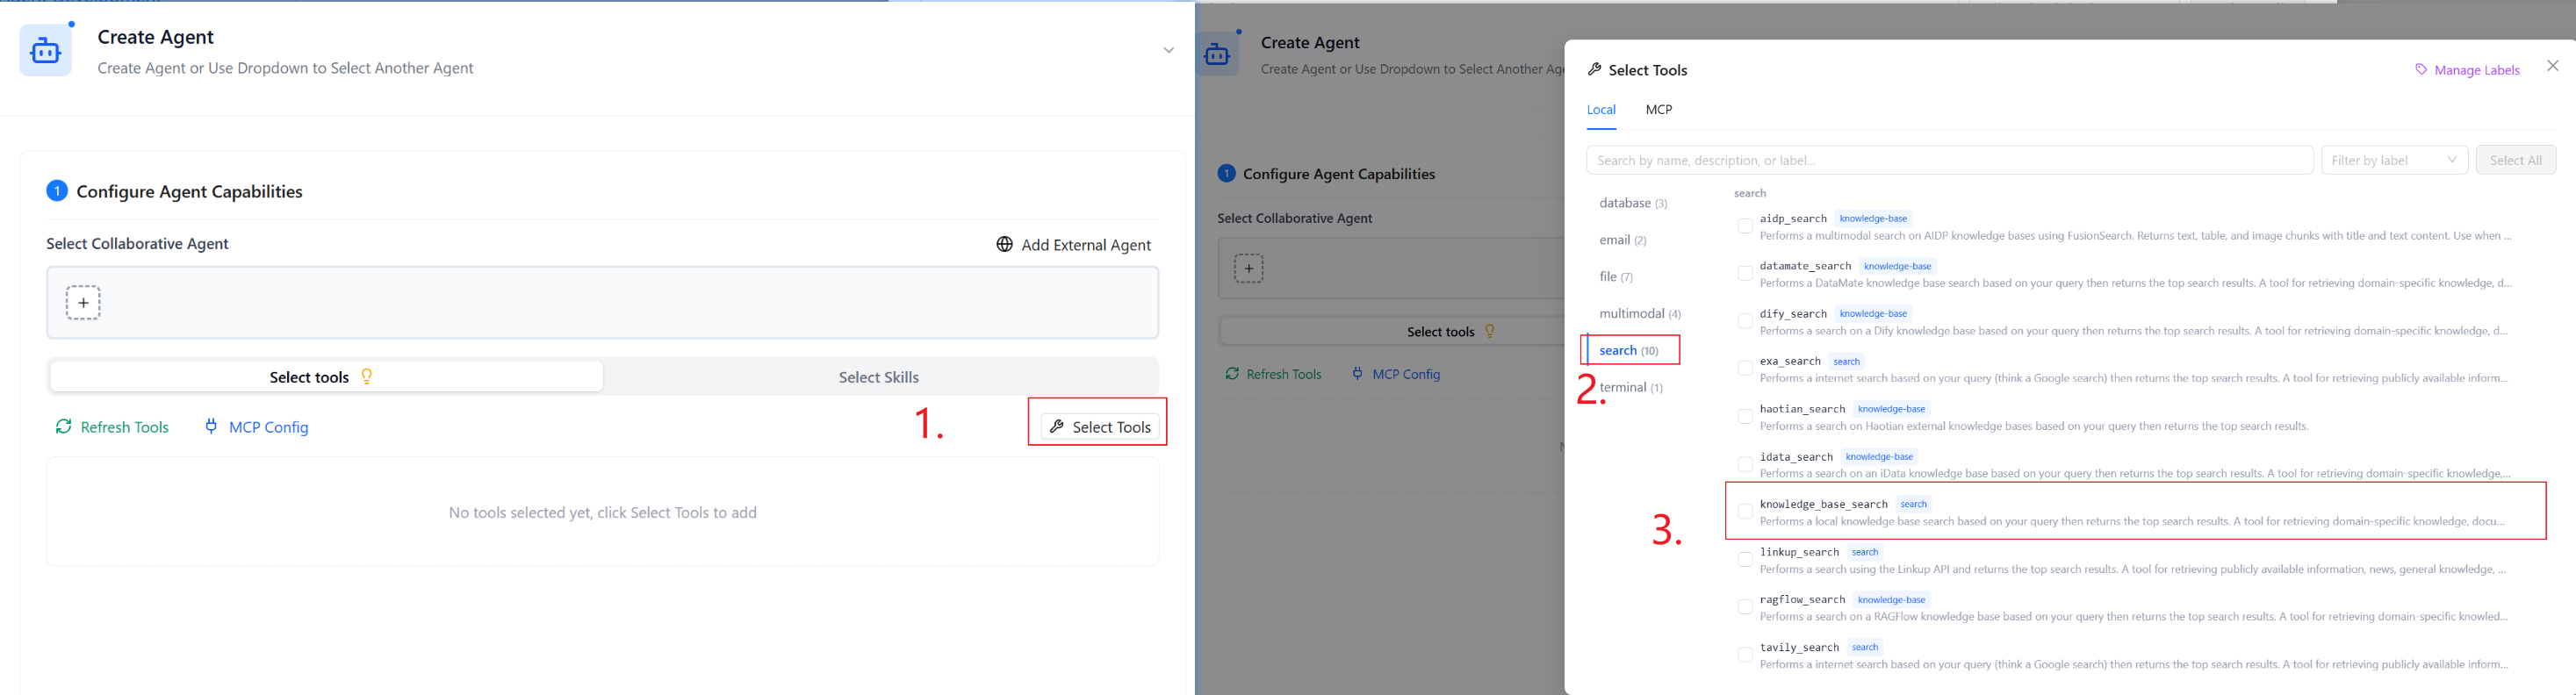
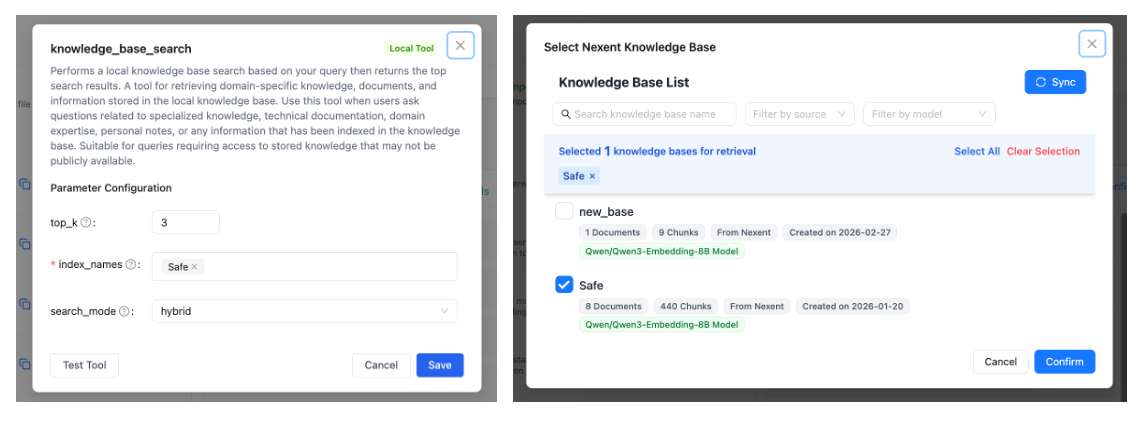
Inside the tool configuration modal, you will see the list of bound knowledge bases with search and multi-select support. Each knowledge base displays its embedding model name so you can confirm compatibility before binding.
🔍 Knowledge Base Management
View Knowledge Bases
Knowledge Base List
- The left column lists every created knowledge base
- Supports searching by name and filtering by knowledge source or embedding model
- Each knowledge base card shows the following information:
Info Description Name The name set at creation time Document Count Total number of uploaded documents Chunk Count Total number of document chunks after splitting Source Knowledge base origin (Nexent native / external source) Created At Date when the knowledge base was created Embedding Model Name of the bound embedding model Multimodal Badge Shown if multimodal support is enabled User Group Tags Names of the user groups this knowledge base is visible to Permission Icon Your current access level for this knowledge base (hover over the icon to see details) No Source File Badge Shown when "Preserve Source File" is disabled Knowledge Base Details
- Click a knowledge base name to view all documents
- Click Details to open the overview page for viewing and editing the summary
Click Edit to manage the knowledge base name, visible user groups, and in-group permissions
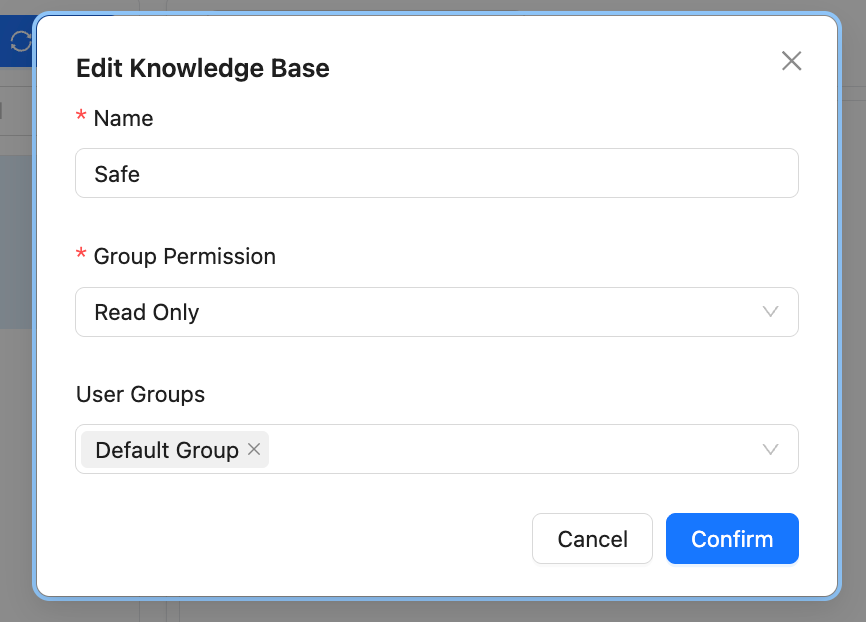
Edit Knowledge Bases
Delete Knowledge Base
- Click Delete to the right of the knowledge base row
- Confirm the deletion (irreversible)
Delete or Add Files
- Inside the document list, click Delete to remove a document
- Use the upload area below the document list to add new files
🚀 Next Steps
After completing knowledge base configuration, we recommend you continue with:
- Agent Development – Create and configure agents
- Start Chat – Interact with your agent
Need help? Check the FAQ or open a thread in GitHub Discussions.