
Agent Development
On the Agent Development page, you can create, configure, and manage agents. The page contains an AI Generation panel and a Configuration panel: AI Generation turns natural-language requirements into a configuration draft, while Configuration lets you adjust settings manually. After configuration, click Debug in the lower-right corner to open the debug panel and verify the agent's behavior.
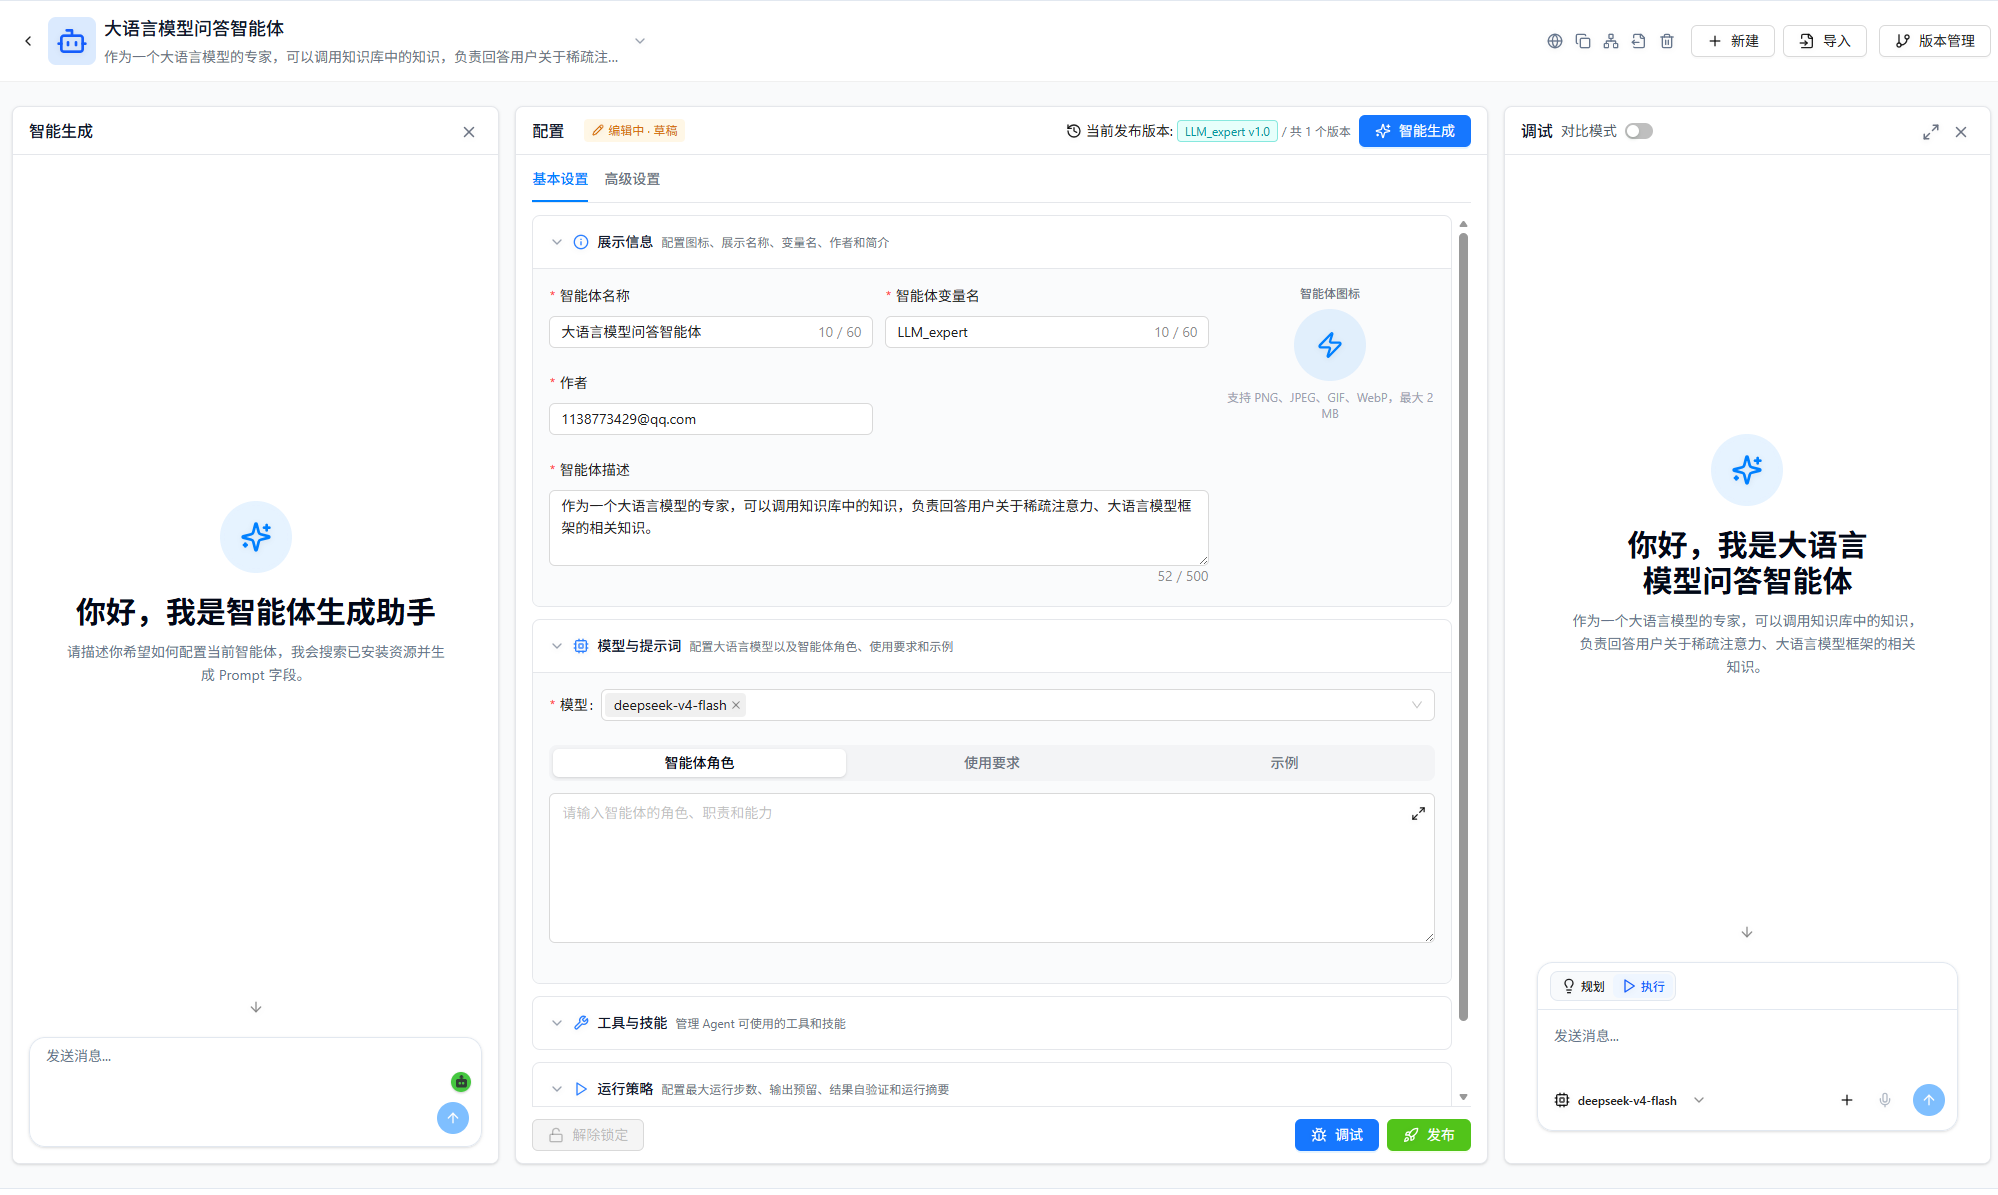
🔧 Create an Agent
On the Agent Configuration tab of Agent Development, click New in the upper-right corner to create a blank agent. After creating or selecting an editable agent, describe the requirement in AI Generation or fill in the Configuration panel manually. If you have read-only access, you can view the configuration but cannot generate or modify it. If you already have an agent configuration, click Import and create an agent from a JSON or ZIP file. For details about export formats, import steps, duplicate-name handling, and dependency checks, see Export and Import Agents.
👥 Configure Collaborative Agents/Tools
You can configure other collaborative agents for your created agent, as well as assign available tools to empower the agent to complete complex tasks.
🤝 Collaborative Agents
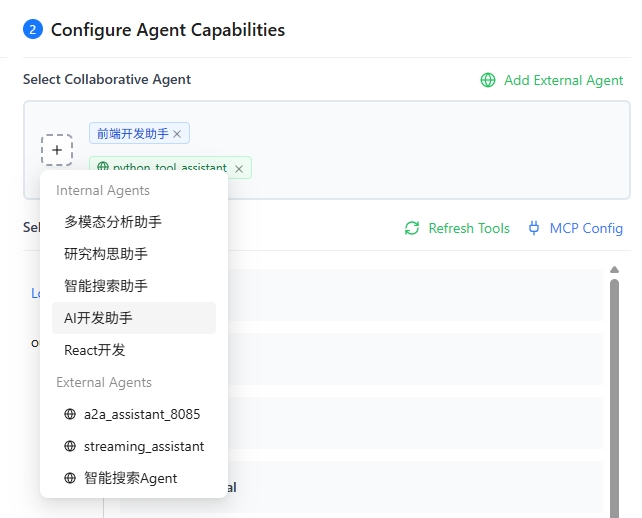
Collaborative agents help the current agent complete complex tasks. The sources of collaborative agents are divided into two categories:
- Internal Agents: Published agents on the platform
- External A2A Agents: Third-party agents discovered through the A2A protocol
- Click the plus sign under the "Collaborative Agent" tab to open the selectable agent list
- The agent list is divided into two tabs: "Internal Agent" and "External A2A Agent". You can choose based on your needs
- Select the agent you want to add from the dropdown list
- Multiple collaborative agents can be selected
- Click × to remove an agent from the selection
🌐 Add External A2A Agents
Nexent can discover third-party A2A agents through URL or Nacos and add them as collaborative agents. For discovery, authentication, protocol configuration, connectivity testing, and a DataAgent example, see Add External A2A Agents. For the overall A2A integration workflow and protocol concepts, see Integrate Agents.
🛠️ Select Agent Tools or Skills
Agents can use tools and skills to complete tasks, including local capabilities such as knowledge base search, file parsing, image parsing, email, and file management. You can also integrate third-party or custom MCP tools and skills.
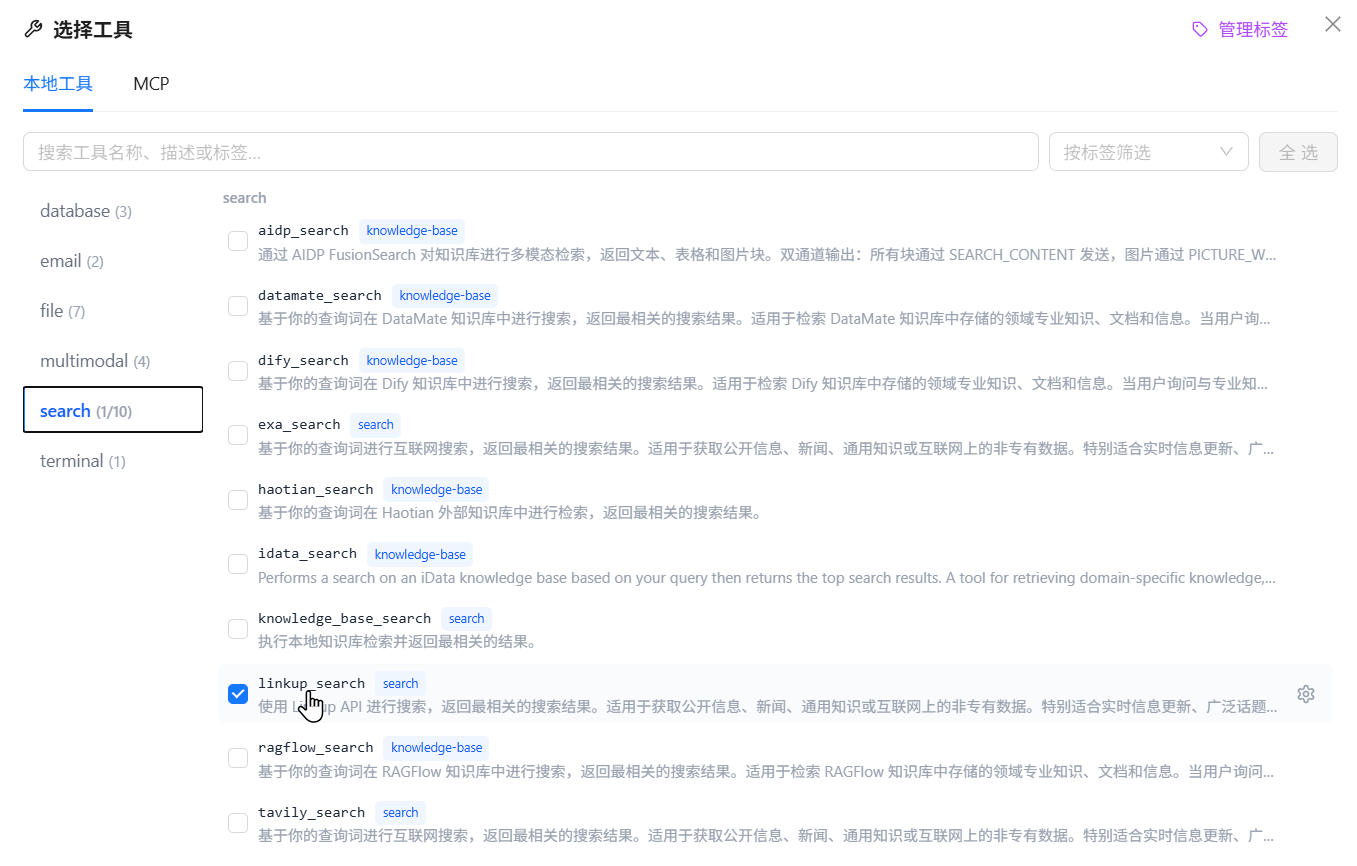
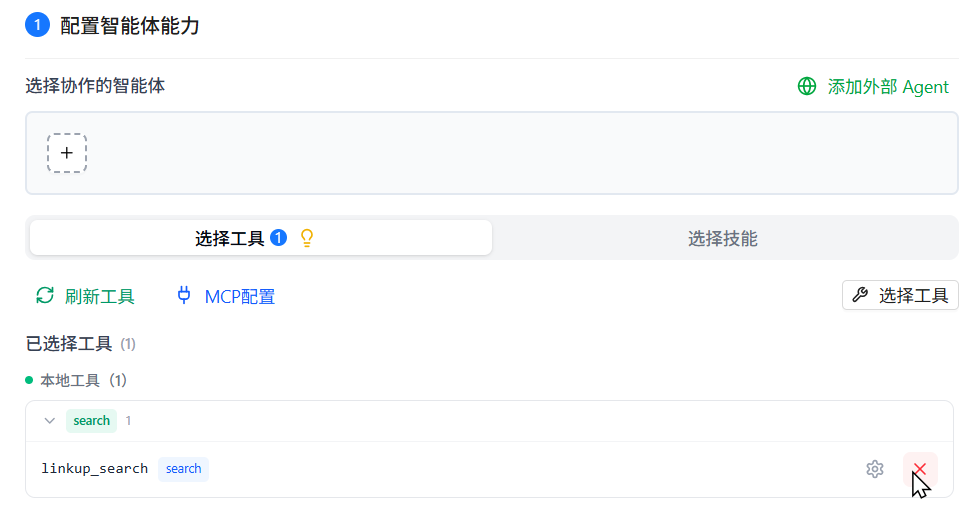
- On the "Select Tools" tab, click "Refresh Tools" to update the available tool list
- Click Select Tools or Select Skills to browse the available tools or skills by tag
- Click ⚙️ to view the tool or skill description and configure its parameters
- Select the tool or skill. You can remove it later from the selected tools or selected skills area
- If the tool has required parameters that are not configured, a popup will appear to guide you through parameter configuration
- If all required parameters are already configured, the tool will be selected directly
💡 Tips:
- Please select the
knowledge_base_searchtool to enable the knowledge base search function.- Please select the
analyze_text_filetool to enable the parsing function for document and text files.- Please select the
analyze_imagetool to enable the parsing function for image files.⚠️ Note: Before using
knowledge_base_search, create a knowledge base and ensure that the embedding model used to create it matches the currently active embedding model. Otherwise, retrieval may fail or return inaccurate results.📚 Want to learn about all the built-in local tools available in the system? Please refer to Local Tools Overview. 📚 Want to learn more about skills? Please refer to Skill Management.
🔌 Add MCP Tools
On the Select Agent Tools tab, click MCP Config to connect a remote or containerized MCP service, or convert an existing API into MCP tools. For all three connection methods, OpenAPI requirements, service management, and tool testing, see Integrate MCP Services.
🔐 Pass User Information to Tools (Tool-side Authorization)
For MCP tools, the platform injects the current caller's user information only when the tool declares the conventional fields below. External A2A agents receive the same trusted snapshot under metadata.user_context.
🔔 Platform boundary: the platform itself performs no authorization for tools; it only passes through the authenticated session identity. Authorization is the tool's responsibility.
How to declare: if a tool's input schema defines any of the conventional field names below, the platform treats it as requesting that user information and fills the field with the current user's value at call time:
| Conventional field | Meaning |
|---|---|
tenant_id | Tenant ID |
tenant_name | Tenant name |
user_id | User ID |
user_name | Login name (currently the user's email) |
user_account | User account (email) |
user_groups | List of user-group names the user belongs to |
Example: a data query tool that enforces data permissions by caller account and groups only needs to declare user_account and user_groups in its inputSchema:
{
  "type": "object",
  "properties": {
    "query": { "type": "string", "description": "Query content" },
    "user_account": { "type": "string", "description": "Caller account (injected by the platform)" },
    "user_groups": { "type": "array", "items": { "type": "string" }, "description": "Caller user groups (injected by the platform)" }
  }
}
💡 Notes:
- These conventional fields are removed from both the model-visible tool signature and rendered tool context: the model neither sees nor fills them, and injected values come only from the current authenticated session, so they cannot be forged
- Undeclared conventional fields are never injected and do not affect the tool's existing parameters
- External A2A agents receive the trusted snapshot under
metadata.user_context; a same-named value in chat metadata is ignored
⚙️ Custom Tools
You can refer to the following guides to develop your own tools and integrate them into Nexent to enrich agent capabilities:
🔌 Create or Import Skills
In the agent's advanced configuration, switch to Select Skills and click Build Skill. You can create a skill through a conversation or upload a .md or .zip file. After creation, select the skill and save the agent configuration before the agent can use it.
For file formats, the SKILL.md structure, upload restrictions, and association steps, see Integrate Skills. For viewing, editing, permissions, and deletion, see Skill Management.
🧪 Tool Testing
Nexent provides a "Tool Testing" capability for all types of tools—whether they are built-in tools, externally integrated MCP tools, or custom-developed tools. If you are unsure about a tool's effectiveness when creating an agent, you can use the testing feature to verify that the tool works as expected.
- Click the gear icon ⚙️ next to the tool to open the tool's detailed configuration popup
- First, ensure that all required parameters (marked with red asterisks) are configured
- Click the "Test Tool" button in the lower left corner of the popup
- A new test panel will appear on the right side
- Enter the tool's input parameters in the test panel. For example:
- When testing the local knowledge base search tool
knowledge_base_search, you need to enter:- The test
query, such as "benefits of vitamin C" - The search
search_mode(default ishybrid) - The target index list
index_names, such as["Medical", "Vitamin Encyclopedia"] - If
index_namesis not entered, it will default to searching all knowledge bases selected on the knowledge base page
- The test
- When testing the local knowledge base search tool
- After entering the parameters, click "Execute Test" to start the test and view the test results below

📝 Describe Business Logic
✍️ Describe How the Agent Should Work
Describe the business goal, intended users, inputs, outputs, and constraints in the AI Generation panel. Nexent can generate a complete configuration or optimize only the fields or resources you specify.
To generate a complete configuration for the first time:
- Describe the requirement: Explain the problem the agent should solve. For example, “Create a product Q&A assistant for after-sales staff. Prefer the internal knowledge base and cite sources in every answer.”
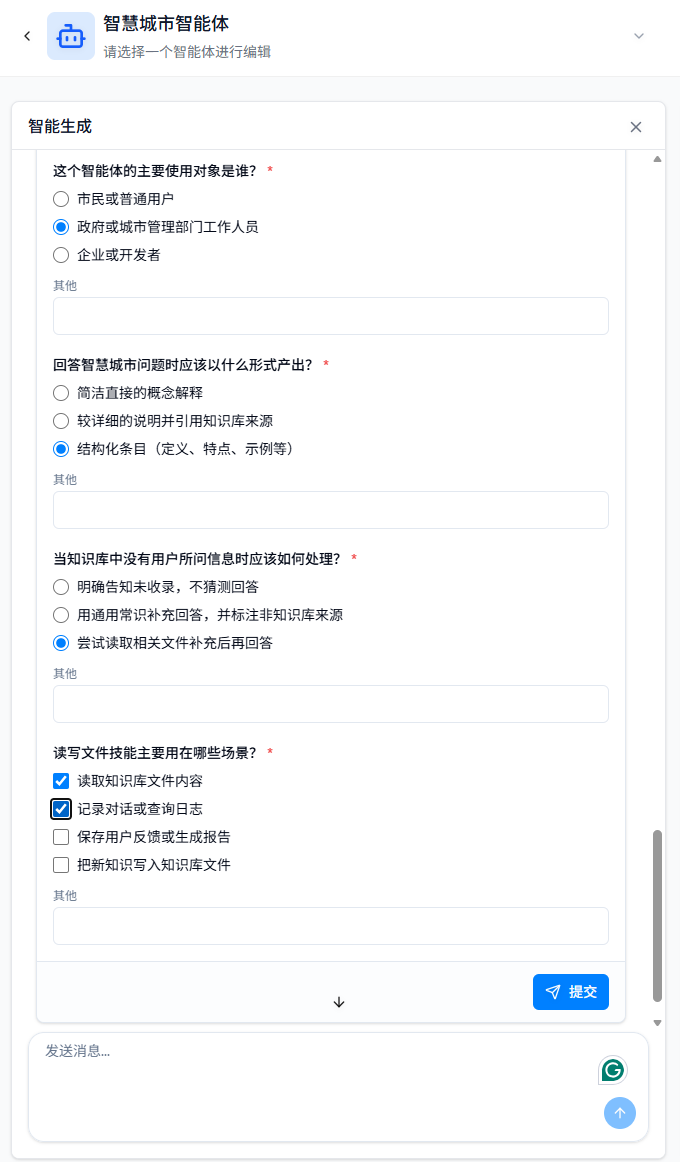
- Clarify the requirement: When information is missing, Nexent displays a question card. Select an option or add details under Other, then submit it.
- Apply the draft: After Nexent generates the description, duty prompt, constraint prompt, examples, greeting, and example questions, click Apply to Draft and review the result in the Configuration panel.
While generation or resource binding is in progress, the configuration form is temporarily locked to prevent manual edits from overwriting generated results. If generation fails or you do not want to wait, click Unlock to stop the current generation and resume manual editing.
For an existing configuration, use the shortcuts in AI Generation to optimize a specific part. Clicking a card fills its instruction into the input box; send it directly or edit it before sending.
| Shortcut | What It Updates |
|---|---|
| Generate Prompts | Generates the duty, constraint, and example prompts from the current role and bound tools and skills; other settings remain unchanged |
| Recommend Available Tools | Finds tools for the current role and regenerates prompts affected by the resources after you confirm the binding |
| Recommend Available Skills | Finds skills for the current role and regenerates prompts affected by the resources after you confirm the binding |
| Generate Conversation Guide | Generates the greeting and example questions; other settings remain unchanged |
AI Generation applies the smallest change required by the current request instead of regenerating the entire configuration automatically. When you add or replace a resource, Nexent updates the prompts affected by that resource. To remove a tool or skill, use Tools and Skills in the Configuration panel.
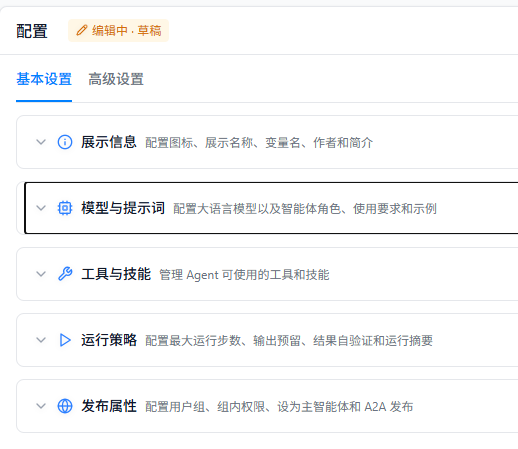
📋 Agent Basic Information Configuration
The Basic Settings tab contains five collapsible sections:
| Section | Main Settings |
|---|---|
| Display Information | Icon, display name, variable name, author, and description |
| Model and Prompts | Large language model, duty prompt, constraint prompt, and example prompt |
| Tools and Skills | Tools and skills the agent can call, including their parameters |
| Run Strategy | Maximum steps, output reserve, run summary, self-verification, and the conversation Metadata switch |
| Publishing Properties | User groups, group permission, main-agent status, and A2A publishing settings |
The agent variable name can contain only letters, numbers, and underscores, and must start with a letter or underscore. Use a meaningful English name such as code_assistant or data_analyst.
If a previously configured model has been deleted, a warning appears at the top of the Configuration panel: Agent unavailable: Some configured models have been deleted. Click Refresh to check availability again, then select an available model under Model and Prompts and save the configuration. Refreshing updates the status but does not restore a deleted model.
Allow Conversation Metadata is disabled by default. When enabled, users can enter a JSON object for each conversation in Start Chat and pass business identifiers, channels, or other runtime parameters to the model. Metadata is visible to the model and cannot exceed 64 KiB. Do not include passwords, access tokens, personal information, or other sensitive data.
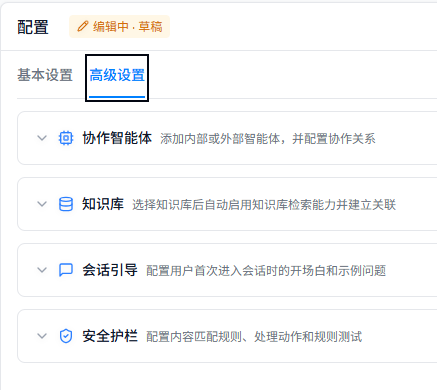
⚙️ Advanced Settings
Use the Advanced Settings tab to configure relationships between the agent and other resources.
Advanced Configuration Sections
| Section | Main Settings |
|---|---|
| Collaborative Agents | Add internal agents or external A2A agents and configure collaboration |
| Knowledge Bases | Select knowledge bases the agent can retrieve from; selecting one enables knowledge-base retrieval and creates the association |
| Conversation Guide | Set the greeting and example questions shown when a user first opens Start Chat |
| Safety Guardrails | Configure content-matching rules, actions taken after a match, and rule tests |
Knowledge bases and collaborative agents must be accessible to the current account. After importing or copying an agent, check these associations again because resource identifiers and permissions from another environment are not transferred automatically.
🚧 Safety Guardrails
Safety guardrails use sequential regular-expression rules to inspect content sent to the model and data involved in tool calls. Guardrails are disabled by default and operate independently of Self-Verification. To enable them, turn on the switch beside the rule list and configure at least one valid rule. Rules are evaluated in list order, and the first matching rule applies to a given piece of content.
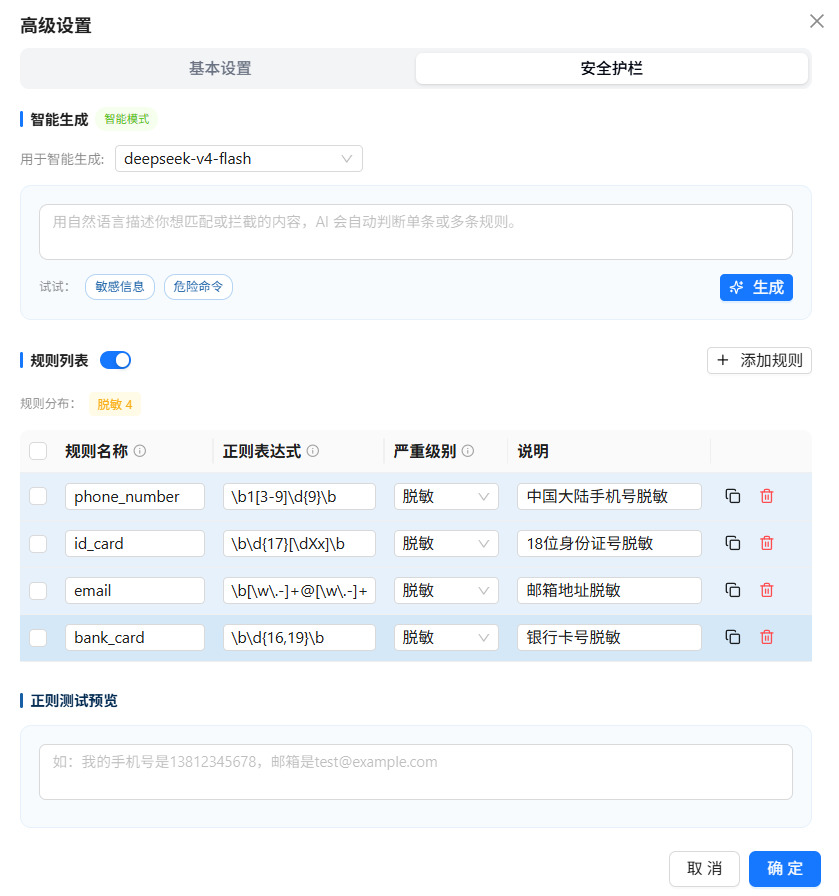
Each rule contains the following settings:
| Setting | Description |
|---|---|
| Rule Name | A unique identifier for the rule. The interface warns about duplicate names; use a name that clearly describes the detection target. |
| Regular Expression | A pattern written using Python re syntax. Matching is case-insensitive by default at runtime; rules with invalid syntax are excluded from runtime checks. |
| Severity | Determines the action after a match: Block, Redact, or Allow. New rules default to Block. |
| Description | An optional explanation of the rule's purpose for maintenance and review. |
The severity levels behave as follows at each inspection point:
| Severity | Latest User Input | Historical Messages | Tool Inputs | Tool Outputs |
|---|---|---|---|---|
| Block | Stop the run and return a refusal explanation | Downgrade to redaction before sending to the model | Prevent the tool call | Because the tool has already run, downgrade to redaction |
| Redact | Replace matched content with *** and continue | Replace matched content with *** and continue | Replace matched string arguments with *** before calling the tool | Replace matched content with *** before adding it to the agent context |
| Allow | Continue without modifying the content | Continue without modifying the content | Call the tool without modifying its arguments | Continue without modifying the output |
Safety guardrails also provide the following supporting capabilities:
- AI Generate: Select a model and describe in natural language what should be matched or intercepted. The system determines whether to generate one candidate expression or multiple rules; confirm the candidate or select the rules before importing them into the list.
- Rule Management: Add, edit, copy, delete, or batch-delete rules manually, and view the distribution of Block, Redact, and Allow rules.
- Regex Test Preview: Paste sample text to preview matched text, rule names, and match counts in real time. The preview validates matching only; it does not perform blocking or redaction actions.
⚠️ Note: Safety guardrails perform regular-expression-based content screening and are not a complete semantic safety review. AI-generated rules can also produce false positives or false negatives. Test both normal and risky samples in Regex Test Preview before saving the configuration.
🐛 Debug and Save
The Draft label at the top of the Configuration panel means the current changes have not become a published version. After the initial configuration:
- Click Debug. Nexent validates and saves the draft, then opens the debug panel.
- Use representative questions to test prompts, knowledge retrieval, tool calls, and collaboration flows.
- Adjust the configuration based on the execution trace and error messages, then debug again.
- Click Publish. Nexent saves the draft again and opens the version publishing dialog.
Only successfully published main agents appear in production entry points such as Start Chat. Debugging does not read or write memory, so verify cross-conversation memory behavior in Start Chat.
📋 Version Management
Nexent supports agent version management. You can save different versions of agent configurations during the debugging process.
After verifying the agent configuration, click Publish to publish it. The agent then becomes visible in Agent Repository and Start Chat, and its version history can be managed.
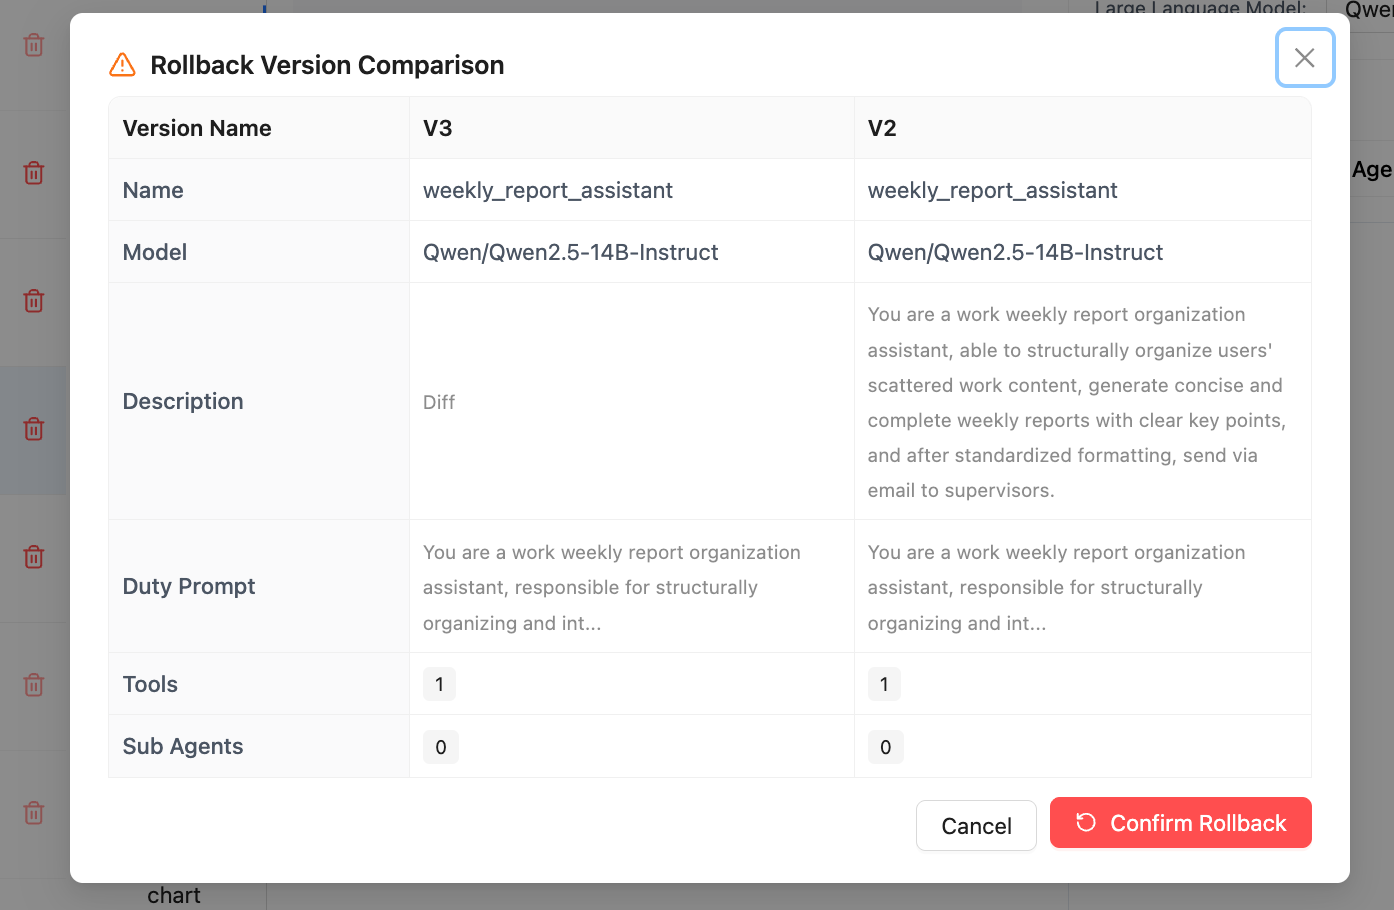
Click the version comparison button in the lower-right corner of Version Management to review a historical version and compare its Q&A performance with the latest version.
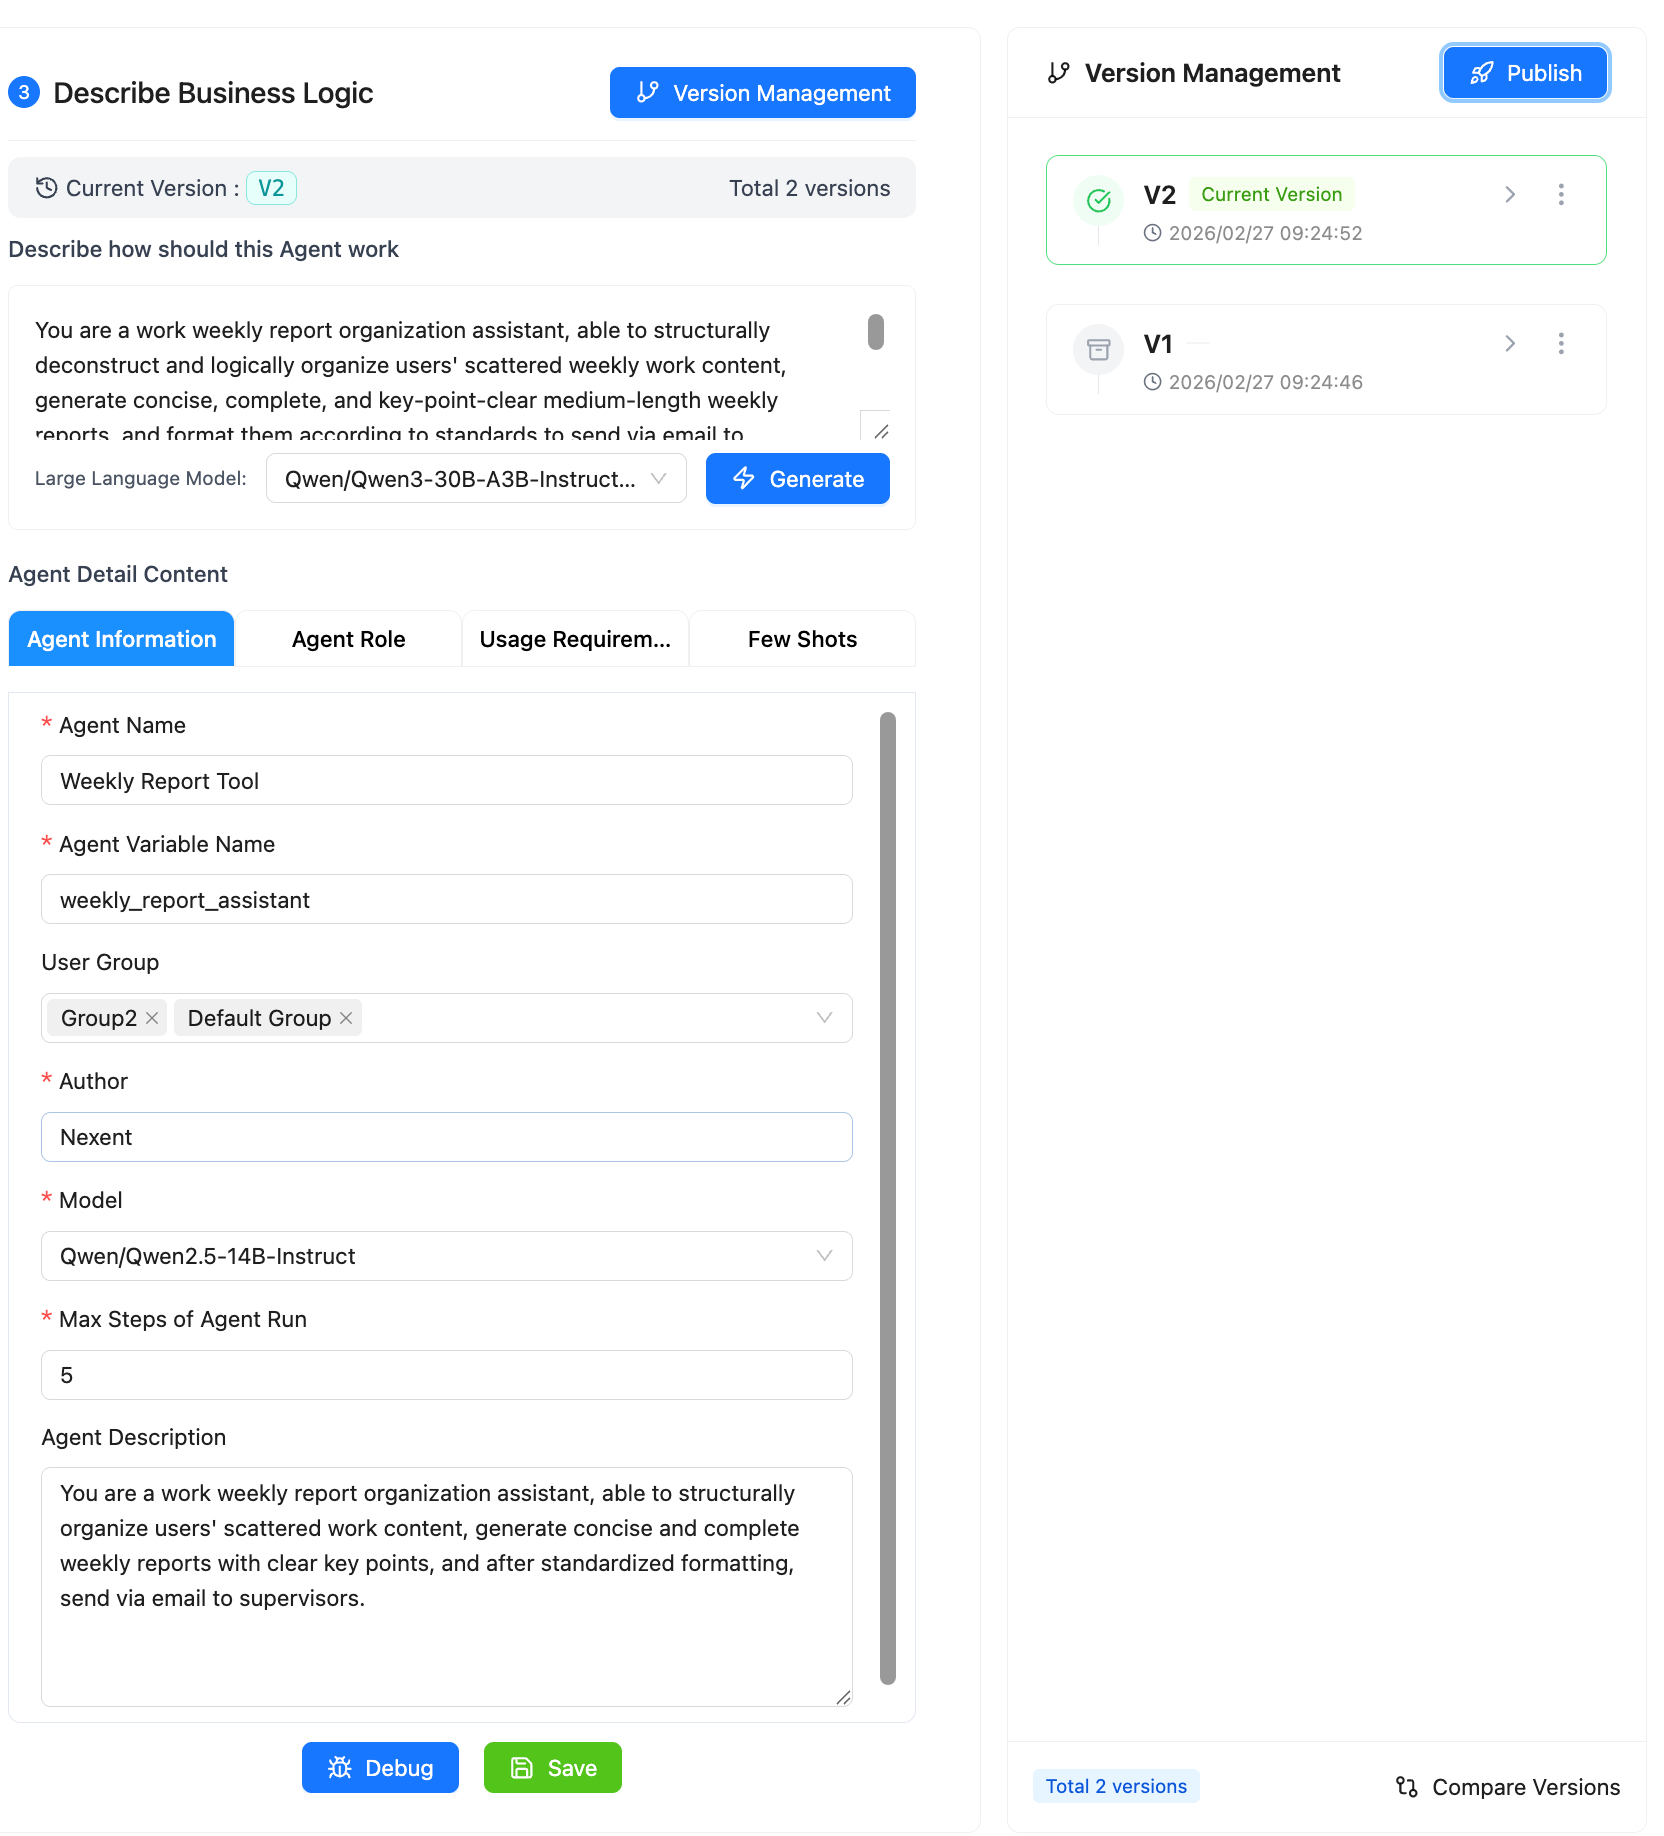
To roll back to another version, open the menu on the right side of that version and click Rollback.
🚀 Publish as A2A Agent
When publishing a version, select Publish as A2A Agent to let external systems discover and call the agent through REST or JSON-RPC. For publishing steps, endpoint information, authentication, and version updates, see Publish as A2A Agent.
To expose an agent through the standard northbound RESTful API, see Publish Agents. For endpoint parameters and complete request examples, see Call the Agent Northbound API.
🔧 Manage the Agent List
Click Select Agent to browse the complete list of agents you can edit in the current environment. Use the search box at the top to locate an agent.
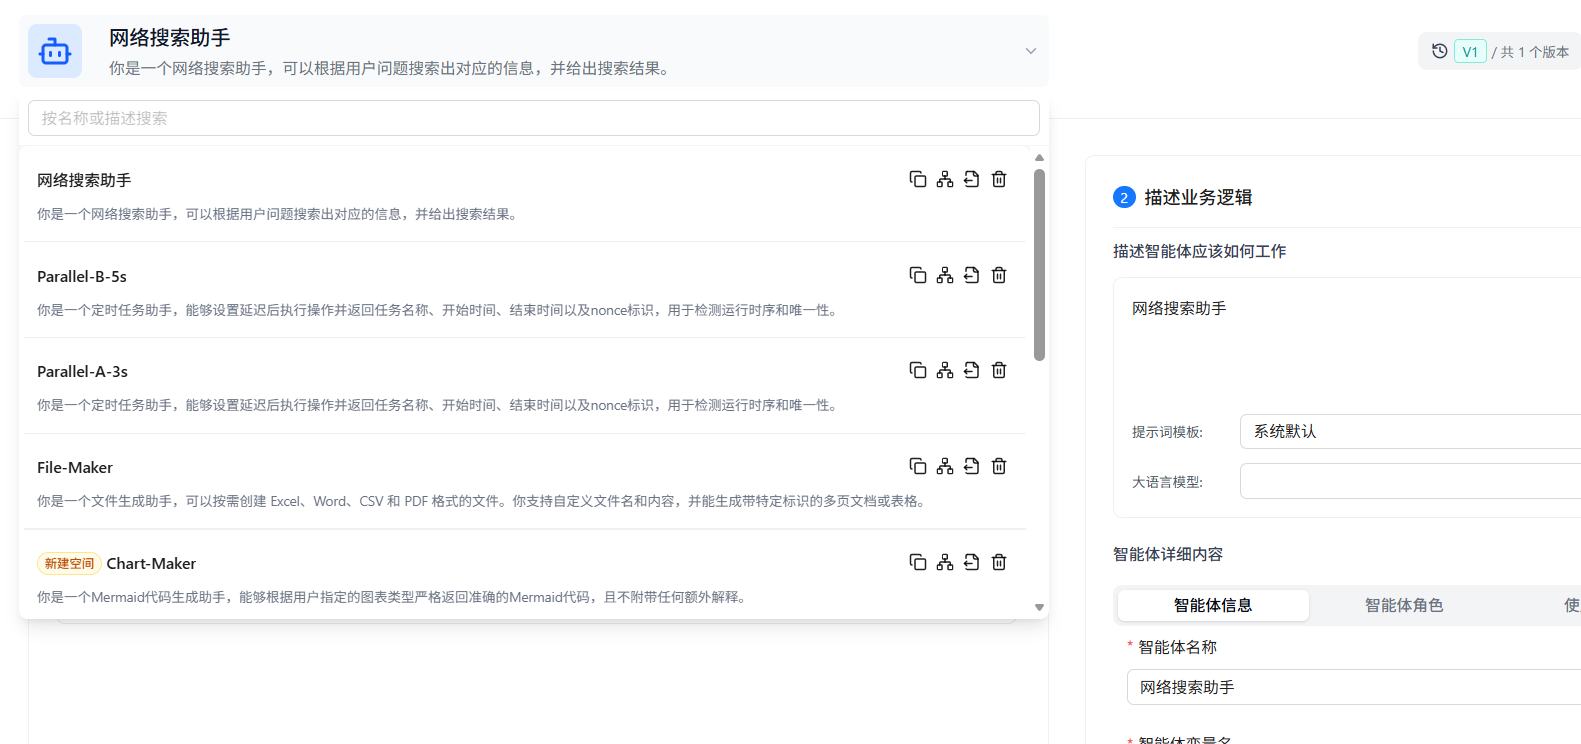
The icons on the right side of each agent represent the available management actions. From left to right, they are:
📋 Copy
Create an identical clone of an agent for version backups or parallel testing.
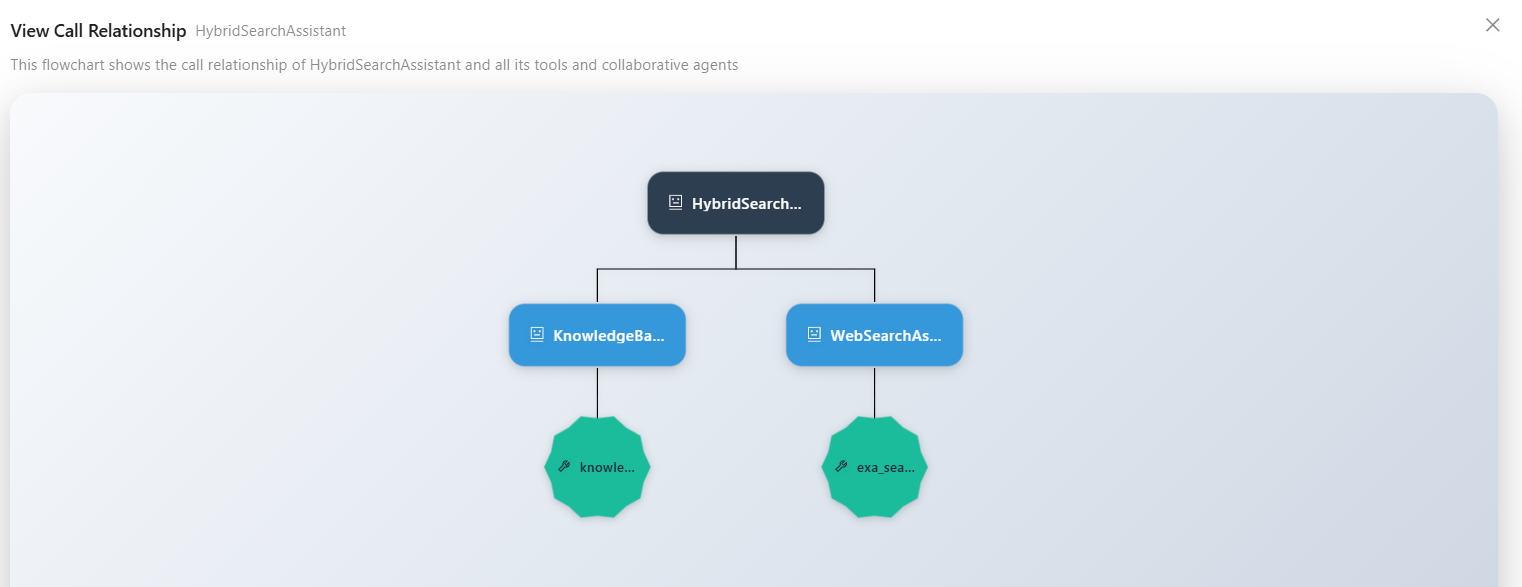
🔗 View Call Relationships
View the collaborative agents/tools used by the agent, displayed in a tree diagram to clearly see the agent call relationships.
📤 Export
Export a successfully debugged agent as a JSON or ZIP file and import it into another environment. For format selection, dependency handling, and import restrictions, see Export and Import Agents.
🗑️ Delete
Permanently delete the agent from the local environment.
🚀 Next Steps
After completing agent development, you can:
- Manage and publish your agents, or discover agents from other developers, in Agent Repository
- Interact with agents in Start Chat
- Configure Memory Management to enhance the agent's personalization capabilities
If you encounter any issues during agent development, please refer to our FAQ or ask for support in GitHub Discussions.